
 |
| "It's just a model" (or in this case, an illustration, but it's still nice) |
 |
| I'll see you later, totally-not-exploded Death Star II! |
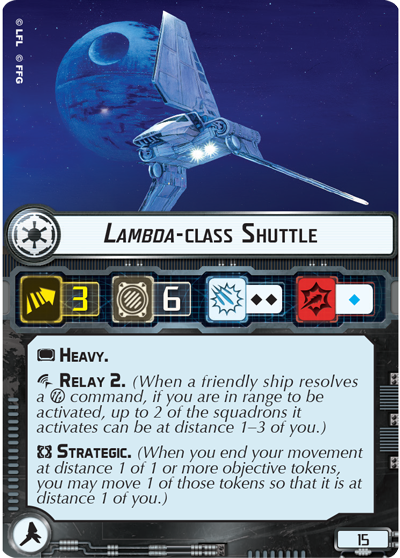
- A slow (for Imperials) speed of 3.
- 6 hull is fine for 15 points but not amazing. Compared to the 8 hull of its VCX counterpart, it feels a little flimsy.
- 2 black dice anti-squadron. That's 1.5 average damage but is very weak to obstruction (going down to just one black die for 0.75 damage) and cannot roll accuracy icons against aces (which is a particular problem against scatter aces).
- 1 blue die anti-ship. This is just as bad as a TIE Fighter but at nearly twice the cost. 50% of the time the Lambda will deal 1 damage to a ship.
- Heavy is never a good thing to have.
In short, your Lambda is getting its mileage mostly from Relay and Strategic and not from its otherwise-underwhelming statline.
Relay 2 works so long as your Lambda is in squad-command range of a friendly ship and it can be used with each squadron command individually. So a hypothetically infinite number of Squadrons 2 ships could issue all of their squadron commands through the Lambda's Relay 2 provided they're all at range to command the Lambda. Don't forget that you can command the Lambda itself to move it to someplace more advantageous (but still within command range) and then use 2 of your remaining squadron command "points" on squads that are suddenly within Relay range.
My main caution with Relay is it can be tricky to find just the amount to rely on it. If you don't make use of it much at all, then you're paying for a worse VCX. If you over-rely on it, opposing fighter squadrons are going to try to sever your squadron command chain. Play it by ear but always keep an eye out for the best place to position your Lambda to help with Relay but be careful against opponents with enough anti-squad firepower to seriously threaten your Lambda. When in doubt, obstacles are great places to hide support squadrons like Lambdas.
Strategic is extremely strong with the right objective suite. Remember that it works when you end a movement at distance 1 of a token and then you pick up that token and drop it at distance 1 of the squadron, so you can move that token quite a ways by picking it up on one side of your Lambda and then dropping it at maximum distance on the other side. Moving objective tokens around can make objectives like Fire Lanes and Intel Sweep nearly unwinnable for your opponent and at the very least it makes choosing opponent objectives with objective tokens much easier for you as first player, as your Lambdas give you some control over them. If your 15-point squadron allows you to earn 75 points on Intel Sweep with minimal hassle then that squadron was a 60-point net profit to you, regardless of what else it did during the game. That's pretty impressive. John goes into a lot more detail on Strategic squadrons and different objectives here, and I'd recommend reading it if you wanted more detail.
The main constraint is finding a fleet build where your Lambda can work to its fullest. It's 15 points of your squadron allowance and it can't fight its way out of a wet paper bag, so it's generally best as a single squadron added on to open up your Strategic options unless you're running a Moralo Eval-focused squadron group, in which case you can justify 3 or maybe even more of them. It can be tough to fit into a damage-focused large squadron group without Moralo Eval around, though, which means it's usually easier to add one to small- and medium-sized squad groups.
 |
| Colonel Jendon can't be killed because he's already dead inside. |
1) You no longer care that much about objective token shenanigans. This can hurt a little bit as Strategic can be very powerful when used well.
2) You have a strong incentive to bring some individually-powerful squadrons so that Jendon's ability gets maximum benefit. Unique super-squadrons like Bossk, Darth Vader, Morna Kee, IG-88, Saber Squadron, Boba Fett, Maarek Stele, etc. all love hanging around with Jendon. So long as Jendon has a big mean friend around he can tap in to fight for him, he's much less of a "waste of points on support" as he's indirectly attacking using a stronger squadron's statline. If you're getting some Relay utility in addition to having your 21+ point super-squadron attack once again, it's almost like Jendon is saving you points (...but not really, but kind of?).
Because of this, Jendon works better with a heavier squadron investment because he loves to help your big expensive squadrons get their extra kicks in. So with that said, I can definitely recommend him provided he has at least two big mean friends he can hang out with. He won't really get a lot of mileage hanging out with swarms of generic squadrons and if he only has one strong buddy, a smart opponent will focus attacks to destroy that super-squadron quickly and then suddenly Jendon is left without a good recipient for his ability. With two or more super-friends in your fleet, "shutting off" Jendon's ability gets much more difficult.
 |
| Jendon came in really handy when the Imperials needed to talk to the Mon Calamari. Or was that Aquaman? |
No comments:
Post a Comment
Note: Only a member of this blog may post a comment.