
Anyways, let's discuss the nefarious conga line!
 |
| I said nefarious, come on guys! That's just adorable. |
A conga line is a number of side-arc ships traveling in a rough line with their broadsides pointed at the enemy as they intend to move past the enemy fleet rather than into them. Because the conga line tends to move with the leader first and then the other ships following behind, it creates the feeling of a group where the leader sets the line and everyone behind follows along, hence the term "conga line." It is not, however, a jovial experience for the opponent and the conga line is especially harsh on newer players; their instinct to direct their ships at the enemy formation leads them flying into overlapping fields of fire and near-certain death.
Back in the early days of wave 2, Admiral Ackbar commanding a number of Assault Frigates (and perhaps an HMC80) in a conga line was the fleet type to beat, and it buried a number of heavier Imperial fleets under an endless tide of red dice. You'll still see conga lines today (and Imperials can do a conga line of their own with enough Arquitens Light Cruisers), but it should be noted that the conga line itself is more of a variant than a specific archetype. Most conga line fleets exist somewhere on the big heavy to swarm fleet spectrum, usually eschewing a heavier squadron investment in favor of bringing more long-ranged combat ships. Because of that, the strategic (fleet building) element of this article will be rather short. If you can handle swarms or big heavy fleets, you've got most of the tools to handle conga line fleets. The most important part is understanding how the conga line behaves and what you can do to counter it, which is tactical.
How does a conga line fleet work?
First off, let's talk about side-arc ships, such as Assault Frigates, HMC80s, (Scout) MC30s, and Arquitens, which are the foundation of a conga line fleet. Side-arc ships share some common features:
- Wide side arcs.
- Decent to good overall speed and maneuverability for their class (sometimes augmented with Engine Techs).
- Subpar overall offensive capability for their class (the exception is the MC30, and that only applies at close range).
- For example, the Arquitens is in the same league points-wise as the Gladiator, which is capable of explosive amounts of burst damage and is in most ways completely different from the Arquitens in how it should be used. Similar comparisons can be made between the Assault Frigate and the VSD and the HMC80 and the ISD.
- This is not to say that you can't get up to decent offensive output (a conga line fleet specializes in upping the offensive output to at least "decent," which we're getting to), but the base attack dice are generally unimpressive.
- The front arc is often very poor for its class. If you're not able to bring your broadside to bear on your enemy, you're going to have a bad time.
- Longer-ranged attacks. Lots of red dice in general (again with the exception of the MC30, which is undergunned red-dice-wise).
Strategic tools against conga line fleets
Ships and squadrons
Having access to a faster more maneuverable combat ship(or ships) can be very helpful for dealing with conga lines. Alternatively/additionally, a heavy squadron fleet, especially if you can command the squadrons at a safe distance (with Boosted Comms and/or Relay or because they are Rogues), should be able to break through a conga line fleet's meager fighter screen and get to bombing the broadsides ships with only limited flak opposition.
Objectives
Because conga line fleets don't like approaching the enemy fleet directly, defensive objectives like Contested Outpost and Intel Sweep can put them in an awkward position where they need to choose between coming at your fleet recklessly to contest the objective or holding off to maintain their usual cohesion at the cost of sacrificing objective points.
Otherwise, it will depend on the conga line's composition. The strongest reliable objectives against them are the defensive ones, though, particularly with a means of pulling objective tokens or objective obstacles deeper into your deployment zone, increasing the distance between the conga line and your "I'm just going to keep winning the game until you stop me" button(s).
Tactical considerations against conga lines
Obstacle deployment
I spoke at this somewhat in the obstacle deployment article, but try to intersperse damaging obstacles about 1/3 to 1/2 way up the table from your opponent's side of the table oriented vertically to put hurdles in the way of where the conga line wishes to go. This can help set the conga line's trajectory in non-ideal places or force them to separate and weaken their formation.
Fleet deployment
In general due to conga line fleets typically leaning heavier on broadsides combat ships than support flotillas and squadrons, most fleets should out-deploy them at least slightly. At the very least, I strongly recommend trying to figure out where the main conga line will be assembling by delaying your deployments as much as you can and then deploying in response to the formation. This usually comes down to two things you're trying to accomplish:
- You want to get at least one ship deployed off on the flank(s) that can be used later to jam up the conga line from the front or nip it from the rear (we're getting to that in a while, so be patient!). This ship (or these ships!) should preferably be adequately maneuverable decent speed combat vessels if at all possible, but anything will do in a pinch.
- You want to try to avoid putting too many ships into an easy killing ground (we're getting to that right after this!) where the conga line can easily get to a target rich environment. Too many ships packed too tightly together on an early battle trajectory with the conga line are going to get in one another's way, both in terms of activations and taking up room that could be used to escape the killing field, which is detrimental to you. Ideally, try to deploy your ships a bit more spread out, but still within range to support one another if necessary.
Wherever the conga line has multiple overlapping fields of fire is dangerous. Usually much more dangerous than it at first appears, because your instinct is "well I'll take a few shots but they're not too bad and those conga line ships aren't so tough," only to find your defense tokens rapidly overheated and damage getting through to the hull with no easy way to disengage to avoid complete destruction next turn all while the conga line kind of swirls around your poor doomed ship.
 |
| Bright red means dead! |
 |
| You see, killbots have a preset kill limit... |
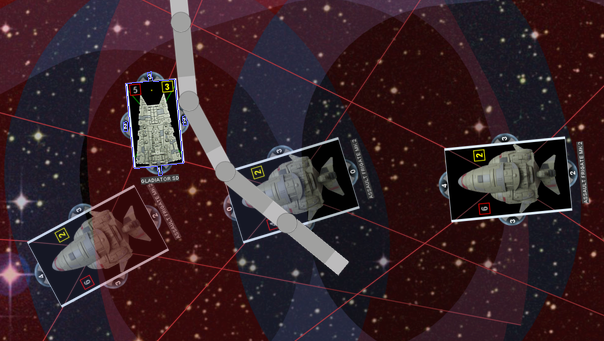
It may be tempting to make an attack run through the killing field with a faster ship, such as a Gladiator. This can work out sometimes, but it usually encounters problems once you need to move after completing your attack. For example:
 |
| Haha, take that, stupid Assault Frigate! |
 |
| Well crap. |
Okay, so what do you do to avoid the killing field, then? Well it really depends on the type of ship and its capabilities, but I can break it down into some rough advice.
For smaller faster ships, you should have the speed and maneuverability to work your way to the front or rear of the conga line while taking minimal fire and avoiding overlapping attack arcs. You'll need to issue a lot of navigate commands and you may only get your attacks in later in the game depending on how roundabout of a route you require, but doing something of value later in the game is preferable to being casually swatted down in the early game as you suicidally charge towards death. It's important to not deploy your starting speed too high with your small ships unless they're already set up to jam up the front of a conga line (which we're getting to eventually).
For heavier slower ships, avoiding the killing field altogether is rather difficult, but you can set yourself up to improve your chances of extricating yourself from the trap. What you're looking to do is two specific things:
- Navigate to preferably engage the rear portion of the conga line (2ish ships) rather than sailing right up the middle and eating the entirety of their guns.
- Once you've exchanged fire, seriously consider the situation. What are the chances your heavier ship can bring serious fire to bear on the conga line in future turns, assuming the conga line turns inward towards you or speeds directly away? Usually it's difficult if not impossible to keep your front arc on the conga line but they won't have nearly as much trouble keeping their side arcs on you. Endlessly turning in towards them while only firing mediocre attacks while they continue to pound on your with their broadsides is a recipe for disaster. If it looks like there's no profit in continuing after them, don't. Speed up and jet away in the opposite direction of the conga line. Hopefully some follow-up attacks from other sources can finish off whatever conga line ships you crippled.
If you yourself are using a broadside ship, you will need to decide if you plan to make an attack run through the killing field by effectively moving parallel to the conga line going in the opposite direction (you can loop around to keep plinking the rear ship provided you survive) or if you're going to try to cross the T by attempting to get your broadside ship to the front of the conga line. Crossing the T can be difficult to do with a heavier broadside ship but if pulled off successfully it can be very rewarding, as you get to cause problems for the conga line, avoid their best attacks, and light them up with your best arc for a solid round or two. Whether or not it's possible will depend on numerous factors, so be careful before attempting it.
 |
| Oh hi, Mark. |
Predictable activation order
Because the conga line ideally wants to benefit from the overlapping fields of fire I just wrote far too much about, it wants to travel in a rough line to maintain the kill zone. The easiest way to do this is to activate the ships in order from front to back. This can make the conga line's activation order extremely predictable, which you can exploit in numerous ways.
It should be noted that when used competently, a conga line can work around this by having ships further back in the conga line activate earlier and maneuver so they end up in a side arc of the ship that was ahead of them. This can still create problems for the conga line as ships end up in non-ideal positions and, when not judged correctly, this can cause collisions. At the very least it can cause formation problems. Either way, try to exploit the predictable ideal activation order to throw a wrench into the works.
Front and back
The front and rear of the conga line are its clear weak points and that's where you should be looking to deliver your attacks. The front in particular is a great place to set up a bruiser ship that can handle a bit of ramming, as it can cause a chain reaction of sadness in the conga line fleet. In the example above with the HMC80 in front of the 3 Assault Frigates, those Assault Frigates aren't going to be capable of throwing many dice at all into the HMC80 (with the obstructed middle and rear Frigates getting one die out the front) and once they need to maneuver, they're going to have a hard time fitting anywhere and may collide. The front Assault Frigate can't escape and will be forced to ram the HMC80. It's just a disaster for the conga line overall.
The easiest ships to get into the front are maneuverable combat ships. Preferably something that can take and dish out a bit of punishment like a Gladiator or MC30, but combat corvettes can do the job just fine as well. Getting larger ships there can be more challenging but pays off handsomely when it can be accomplished. Regardless, it's usually best to orient your blocker ship forwards so it can ram the front of the conga line and remain in place, safe from the broadsides kill zone. Blocker ships, especially the small ships, can't survive ramming forever, though, so be prepared to make a sacrifice or have an escape plan handy for when the hull damage starts piling up.
The rear of the conga line doesn't offer the same advantage in terms of causing a logjam for movement, but it otherwise still benefits from being very safe from enemy attacks and it exploits the activation order issue with conga lines to encourage the rearmost ship to go ASAP to hopefully escape being nipped from behind.
Squadrons
As I mentioned earlier, most conga line fleets don't invest many points into fighters and so a dedicated bomber fleet can capitalize on that provided you can keep your carriers out of the kill zone. Otherwise, follow standard bomber protocol and gang up on individual ships and try to put your squadrons in the most annoying arcs so flakking them isn't easy. If possible, loading them into the front or rear of the conga line can assist ships that want to be there anyways and makes flakking them extremely ineffective overall.
Anticipating "The Turn"
The final item I want to talk about here is what I've heard referred to as "The Turn." What this references is both a game round (often called a turn, I do it when I'm not paying attention too) as well as the act of turning, in which a broadside ship individually or a conga line overall determines the course it will more or less follow throughout the rest of the game, usually in response to a threat coming from its side arc or, more often, its front arc. For example:
 |
| Going from "I'm gonna ruin his day" to "oh crap" in one second flat. |
 |
| Never go in against a space hoagie when death is on the line! |
Both ships don't need to be speedy ships, you could use just about anything in the above example provided there are two ships. Having at least one of them be speedy enough to reliably sneak around the front, however, helps substantially.
Final thoughts
Conga line fleets are manageable once you understand how they work and in general even though you'll find side-arc ships (particularly the HMC80 and the occasional Assault Frigate) placing well in top fleets at competitive events, full-fledged conga lines have not been taking top spots overall in the greater meta since the end of wave 2. They're still something that sees a lot of use in local communities, however, especially those that favor heavier slower ships that are naturally weaker to the conga line approach.
My main issue with conga lines is when it comes to newer players: conga lines are easy to use and design, so they're a good learning tool for new players. The problem is they're particularly potent against other new players, whose instinct is to launch their combat ships at the enemy combat ships for a good ol' fashioned dust-up. Conga lines are very strong against a head-on rush of this kind and it can leave opposing new players very frustrated, as they don't yet have the skills to outplay the conga line and it feels hopeless. I hope in some small way this article has helped anyone stuck in that kind of situation find a way out. Thanks for reading!
No comments:
Post a Comment
Note: Only a member of this blog may post a comment.