
 |
| So are you more of a red lighting or yellow lighting kind of guy? |
GSDs feature an average amount of hull for a Command 2 small ship (5) and a total of 8 shields, with more shields pushed to the front. With a brace, evade, and redirect token, they have an excellent variety of defense tokens that will stand them in good stead against a variety of attacks but without any duplicate defense tokens, they're vulnerable to accuracy results locking down the best defense token in any given circumstance. Engineering 3 isn't stupendous, but it does allow for repair tokens to regenerate one shield or a full dial to heal a bad face-up damage card. Please note that overall the Gladiator can take more of a pounding than a lighter corvette (like a Raider or CR90), but it's generally going to wilt under heavy or sustained firepower.
At Squadron 2, Gladiators are mediocre at commanding squadrons. They don't have any offensive retrofit slots for squad-focused upgrades and they're also specialized towards short-ranged knife fighting and so their upgrade slots are nearly always better spent towards improving their ability to destroy ships rather than to paper over their mediocre ability to command squadrons. You can certainly use them to pitch in on squadron commanding when you need to get as many squadrons activated in one round as possible, but being a carrier is not the GSD's strong suit.
In terms of the speed chart, GSDs do just fine. The maximum speed of 3 is fine and 2 total clicks of yaw are present at all speeds - it's a fairly nimble ship up until it gets a bit unwieldy at speed 3. It won't be out-maneuvering corvettes, mind you, but it's otherwise equivalent to superior to most other ships in the game and it can be improved with Engine Techs.
Basic usage recommendations
Fairly straightforward, really: you'll notice a large number of black dice in the battery armaments of both Gladiator variants and your job is to deliver short-ranged pain as quickly as possible without dying pointlessly first. No pressure, right? In general, so long as you're good with the basics of running black dice ships, you'll be fine.
Beyond the basic black dice tips, Gladiators specifically should be used with a few things in mind:
- Your first Gladiator should always be the Demolisher unless you've got a really good reason not to. We're getting to Demolisher shortly.
- Savvy opponents know what to expect from Gladiators, particularly the Demolisher, and therefore would like to deploy away from them, minimizing their impact. For that reason, you should generally be looking to deploy your Gladiators last if possible once you know where the enemy ships are.
- Try to set up your Gladiators so they can begin turning back in towards the enemy fleet after attacking. A Gladiator that runs straight at an enemy fleet's ship line will get to attack one ship, overshoot that ship when it's done, and then have a very hard time turning around in time to do anything for the rest of the game. If you come in from the sides, you can roll up the flank and have a reasonable shot at getting other ships in the flank or rear.
- Be careful of biting off more than you can chew by throwing your Gladiators in before the rest of your fleet has caught up. Such overextended Gladiators are often picked apart, particularly by squadrons.
- Don't be afraid to start off a bit slower and use navigate commands/tokens + Engine Techs to pounce on your targets - starting off too fast can result in you getting overextended or telegraphs your intentions too early. Similarly, don't be afraid to slow down to improve your turning radius once it's time to circle back on other enemy ships
- With only one redirect, your 1-shield rear hull zone is particularly vulnerable to persistent attacks, like those from squadrons or parting shots from the rear or side hull zones of ships you've hopped over. Having a plan for how you're getting out of an attack run is almost as important as the plan for how you're getting in.
Titles
Okay with all that out of the way, let's get to the two Gladiator titles, starting with a title that's so good, many people know the Gladiator-class Star Destroyer simply as the Demolisher-class Star Destroyer:
 |
| Listen up 5s, a 10 is speaking. |
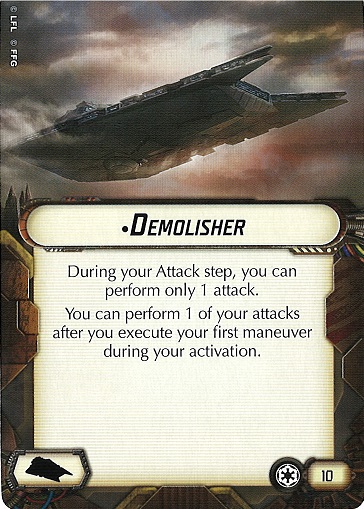
First things first, be aware that Demolisher has been changed in 1.5 and the above card is current. Let's get to the rules.
- Demolisher limits you to only one attack prior to maneuvering. So make sure that attack counts.
- You may perform your remaining one attack after your first maneuver.
- Specifically, this means prior to an Engine Techs move in most cases.
- You still need to follow the other rules of making attacks, so you can't attack twice from the same hull zone in one activation even if one came before and one after your first maneuver.
- The attack doesn't need to be against ships. You can always flak after moving if you like.
Unlike earlier editions, Demolisher use is now mandatory so there is a downside to taking this title in 1.5. That said, it's still a great title and I continue to strongly recommend taking it. If you want to do the old-school "Demolisher triple-tap" where Demolisher would cruise on up and unload on a ship during round X and then activate early and double-arc that same ship on round X+1, you still can - it just requires that you ram that ship with your maneuver so you stay put. It's a dangerous tactic, though, as it leaves you stuck in place somewhere potentially rather unpleasant so try to avoid doing that unless it's safe to do so or you're piece-trading Demolisher for something more valuable.
With clever maneuvering, you can come in against an enemy ship at an angle and then activate to shoot out the front or side and then maneuver and fire out the front or side against the same target. That said, you typically won't be able to focus all three of those attacks against the same hull zone, but it's much safer than the ramming plan.

 |
| Winner of the "I'm also here, I guess?" award since wave one |
The Insidious effect is pretty straightforward: if you're attacking the rear hull zone, you get to add your black dice from your battery armament at medium range.
Insidious is a title that is rarely useful, but with some clever positioning you can improve that to "occasionally useful." The main mistake I see people make when trying to leverage Insidious is to try to sneak it around behind the enemy fleet. Given medium range isn't much longer than close range, this approach usually results in disappointment as enemy ships don't have a tough time getting to long range (or out of any range whatsoever) while Insidious ineffectually tries to catch up to them, only to be disappointed time and time again.
Where Insidious sees more use is on a second follow-up Gladiator to the Demolisher or other ships, such as Raiders, that may get in a solid hit or two but leave the target weakened but not destroyed. The follow-up Gladiator likes to position itself to get in its attacks (preferably by double-arcing) the turn AFTER the target took its earlier punches and/or as a legitimate threat to a ship seeking to escape the kill zone by moving forward. Crippled enemy ships are often quite anxious to get out of there are fast as possible and that's where Insidious can come in useful. For example:

All that said, I'm making the devil's advocate argument for Insidious. I have occasionally gotten use out of it, but for the most part it stays in the binder and I don't miss it. It's rare enough right now to bring a second Gladiator to a game and I'd generally rather save my points for other upgrades instead of using Insidious if I do.

Gladiator-I
I encourage you to consider the Gladiator-I the default Gladiator; it just wants to run in and throw fistfuls of black dice at enemy ships and doesn't do anything that isn't about that. The main considerations come from which upgrades to give it and how much you're willing to invest in it.
Upgrades
Officer
You've got an awful lot of options here and they largely break down into whether you want to improve the Gladiator's life expectancy, its offensive options, or its command efficiency.
Team Defense: Admiral Montferrat, Minister Tua, Iden Versio, Reeva Demesne
Gladiators punch above their weight but without access to a defensive retrofit they don't really tend to live terribly long. Your opponent will be trying their very best to shoot yours down before they get to do much. Defensive officers can help keep your Gladiator on the table just a little while longer. Among this crew, I tend to prefer a cheaper officer like Reeva or Montferrat to keep the cost down. You can use Captain Brunson here too but 9 points is an awful lot on a Gladiator.
Team Offense: Intel Officer and Officer Ozzel
These two are about as different as you can be while still technically being on Team Offense together. Intel Officer does what he does: makes those mean Gladiator dice hurt. Given Gladiators don't tend to roll accuracies much (just 2 red dice out the front and none in the sides), Intel Officer gives you a tool to put some pressure on high-impact defense tokens like braces and the like. This is especially useful when you'll be getting a few attacks in from Demolisher on one target (due to triple-tapping or just regular double-arcing). Ozzel, however, lets Demolisher sneak forward on the starting line and seriously threaten to attack enemy ships on the bottom of round 1. Just make sure to have an exit strategy or at least trade up so Ozzel's sacrifice won't be in vain.
Team tokens: Wulff Yularen and Commander Vanto
These are kind of the in between fellows that give you a bit more flexibility. In either case, Gladiators want to be doing as many commands as possible most rounds but generally mine tend to settle for navigate or concentrate fire with the rare repair tossed in there. Wulff and Vanto can assist in feeding token-hungry upgrades (like Engine Techs) or just let you keep doing more than one command per round by providing an easy source of tokens, allowing you to hit the concentrate fire or repair button more than you might have otherwise.
Weapon Team
It's Ordnance Experts. Ordnance Experts all day every day. You throw a lot of black dice. You need them to reliably connect. Ordnance Experts gives you want you want for a very cheap cost.
Generally, this is the Engine Techs slot. The obvious use is a fake speed 4 (3+1) maneuver but Engine Tehcs offers more than just that - the extra speed-1 maneuver with double clicks at the end adds substantial maneuver flexibility to Gladiators. That said, Engine Techs are 8 points and I no longer consider them mandatory for Gladiators. They're still pretty good, though, and I try to get them in whenever I can. Otherwise I tend to leave this blank unless it's for a weird build, which we'll cover soon.
Ordnance
It's a choice between External Racks and Assault Proton Torpedoes for 4 points or upgrading those to Assault Concussion Missiles for +1 point. All of those are great choices - External Racks is a one-and-done upgrade but there's nothing quite like tossing 7 dice out of an arc (with concentrate fire dial). Alternatively, you can get more consistent use from APTs or ACMs, depending on how long you expect your Gladiator to hang around being a nuisance.
Builds
Standard Demolisher
Demolisher, Reeva Demesne, Ordnance Experts, Engine Techs, Assault Proton Torpedoes
When in doubt, this is your usual run-of-the-mill Demolisher build. It works. It's a little pricey, but it works.
Used Car Lot Demolisher
Demolisher, External Racks, Ordnance Experts
Sometimes you just want a cheap threat that requires someone takes it seriously or else it can mess them up but you don't mind if it gets blown up when they do because you've got more important things to do. That's the job of Used Car Lot Demolisher. If Standard Demolisher is one of the premier damage-dealers in its fleet, Used Car Lot Demolisher is usually playing second or third fiddle to whatever else the fleet is doing. You're looking to spend minimal points while maintaining a legitimate threat, basically.
Doctor McNinja
7th Fleet Star Destroyer, Projection Experts, Ordnance Experts, External Racks, your choice of officer (I'd probably default to Wulff)
This is a very weird Gladiator build but it did well for several Canadians at Worlds earlier in 2019. Basically its goal is to follow around a 7th Fleet ISD and use Projection Experts and 7th Fleet to assist with incoming damage. If your opponent doesn't take it seriously enough it still has teeth if they get too close. Wulff assists with keeping repair tokens handy for Projection Experts.

The Gladiator-II trades out one of its side black dice for a red dice and upgrades its anti-squadron flak to two blue dice for +6 points over a regular Gladiator-I. In general I view the red dice on the side arcs as a downgrade: they do less average damage than black dice (0.75 versus 1), they can't roll black crits for my black crit upgrades, and Ordnance Experts don't work on them. Their only upside is they have a 1/8 chance of rolling an accuracy result, but that's pretty unreliable. For these reasons I don't generally recommend using Gladiator-IIs.
If your fleet brings along Captain Jonus, however, you can combine your Gladiator-II with Jonus to get guaranteed accuracy results on your red dice, which makes the Gladiator-II particularly deadly against ships with single brace tokens and against flotillas in particular, which are not at all the Gladiator-I's desired targets (being too much work to destroy due to their scatter token). Just keep in mind like with any plan involving two separate elements working together you should do your best to get your combination working but you need to be prepared for what happens if it doesn't. Other than "basically build it like a Gladiator-I but bring Captain Jonus along", there's one other fun little build that looks to leverage the Gladiator-II's benefits over the Gladiator-I:
Builds
The Fantastic Flying Flak Factory
Demolisher, Agent Kallus, your choice of other upgrades as usual
With 2 blue flak dice, a Gladiator-II Demolisher can spend its free time producing a sizable quantity of directed flak by attacking squadrons out of one of its arcs and then moving and attacking the same squadrons again from a new arc. Agent Kallus adds an extra die of any color when attacking unique squadrons, so he can be triggered more than once pretty reliably and he's happy to add black dice to your flak attacks that can be rerolled by your Ordnance Experts. For example:

If you want to really double down on flakking squadrons, Ruthless Strategists isn't a bad call with the right squadron builds, but it makes Demolisher much less potent against ships without the reliable black dice reroll from Ordnance Experts.
Great article! Thank you, best blog! :-)
ReplyDeleteThanks! I'm glad to hear you liked it!
DeleteThese ship review articles are always huge projects just due to all the moving pieces, so I'm happy that others are finding them useful!
Very good review! Thank you so much.
ReplyDeleteYou're welcome! Glad I could help.
DeleteFor me as a newbie, it is a really good guide how to master the gladiator!
ReplyDeleteWhich upgrade would you pair with Tua? ECM seems too expensive--RBD?
ReplyDeleteElectronic Countermeasures all the way. It's only 2 more points than Reinforced Blast Doors and keeping the brace safe can make the difference between life and death.
DeleteIt gets pricey, which is why it's more common to see Brunson as the defensive officer, but with the big dice pools flying around nowadays ECM is a safer bet than it's ever been.
Fair enough, thanks. Keep up the great work!
ReplyDelete