
Hot off the heels of the TIE-Fighter-cousin Vulture Droids, let's talk about the kind-of-a-TIE-Interceptor, the Droid Tri-Fighter Squadron.
 |
| Also enjoy this sweet rotating gif of said tri-fighter. |
 |
| Angry bowling balls with mohawks are coming for you. |
The Droid Tri-Fighter as mentioned is similar in many ways to the Imperial TIE Interceptor. It has:
- The same speed (5)
- The same hull value (3)
- Counter 2
- Swarm
- The same points cost (11)
- Similar anti-squadron values when commanded
So
it stands to reason that its usage is fairly similar to that of a TIE
Interceptor and to some degree that's true. It's an extremely fast squadron focused mostly on getting the alpha strike against vulnerable enemy squadrons and it's got Counter 2 and Swarm to get some extra kicks in when your opponent's squads fight back. It's also flimsy and dies just as easily as the cheaper TIE Fighter/Vulture Droids if your opponent goes after it. You're left with a similar problem to the TIE Interceptor: you don't really want people going after your flimsy moderately expensive squadron but if you want to gets your points' worth, it helps to have Counter kicking in.
That said, the Tri-Fighter is in my opinion superior to the TIE Interceptor due to one crucial difference: it rolls a black die against ships instead of a blue die. It doesn't seem like much but being 50% more effective against ships (0.75 average damage compared to 0.5 average damage) is a big deal. And it's on a Swarm squadron you can bring back to life with Reserve Hangar Deck if needs be. This doesn't make Tri-Fighters decent bombers, mind you, but it does give them a decent secondary use if they've got nothing better to do or you need just a little more damage into a ship at a crucial moment. As always with flimsy squadrons, be mindful of avoiding flak whenever you can as you'll wear down quickly against serious resistance. When possible, go after ships that have already activated and/or have bigger problems than a few angry bowling balls showing up off the starboard bow.
This superior anti-ship attack comes at the price of a worse anti-squadron attack. 2 blue and 1 red die is only 1.5 average damage, the same as a basic TIE Fighter, and the red die is particularly fickle when you consider the critical results do nothing and you may not have a use for an accuracy result. Much like the Vulture Droids, you're relying on AI to bring you up to competency. Again like the Vulture Droids, the gap in performance between squadron-commanded and unassisted Tri-Fighters is vast: not only does losing out on AI hurt you but waiting until the Squadron Phase to attack with your 3 hull squadron means you may be dead before you get a chance to do anything. You need to punch early and punch often with glass cannon squadrons like Vultures and Tri-Fighters.
When using AI, it's going to depend on your situation - don't be afraid to use Swarm to reroll one die before committing to what color die you want to add due to AI. Generally you'll want to add a blue die, especially against aces where you don't have enough accuracy results yet. That said, if you're pretty happy with your initial dice roll and have a Swarm reroll waiting in the wings, I'd go for adding a red die - a rerollable red die does slightly more average damage against squads than a rerollable blue die (0.81 vs. 0.75).
With AI and Swarm, you'll be doing similar damage to squads as an Interceptor - an average of 2.45 damage. Just make sure you keep giving them those squadron commands they need to perform at peak efficiency.
 |
| I know it's a ship but I swear it looks like that asteroid has a giant gun. |
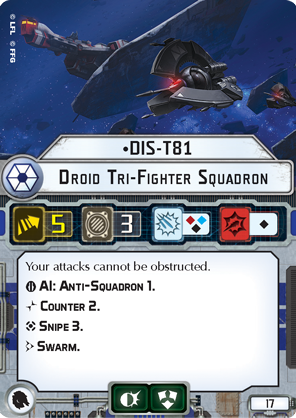
DIS-T81 (pronounced dis-tate-one, or "just ate one" which is what you'll be doing to enemy squads throughout the game) is Saber Squadron on every performance-enhancing drug known to man for an absolutely ludicrous 17 points. For +6 points over a normal Tri-Fighter you gain:
- Your attacks can't be obstructed
- Snipe 3
- A brace and scatter defense token
- Your anti-squadron drops one blue die and gains one black die (2 blue 1 red becomes the painbow of 1 red 1 blue 1 black).
- This improves your anti-squadron damage at the cost of being less likely to generate an accuracy result.
It should be noted that just like Flight Controllers work to improve Snipe attacks, so does AI. So your Snipe attacks while resolving a squadron command will be for 4 blue dice (you can only add a color that's already in the pool and Snipe is mandatory blue, so it has to be blue). And just like Saber Squadron, you will also get the Swarm reroll on your Snipe attacks (if they qualify by having a friend engaging your target of course).
Ideally you should be abusing speed 5 and your special rule to jump into obstacles and stay at distance 2 and Snipe like mad, relying on Counter 2 and your defense tokens if/when enemy squads finally catch up with you to punish you for your innumerable robot sins.
 |
| Pictured: DIS-T81 welcoming you into his home. |
Just like with Saber Squadron, the issue of "I have this great anti-squadron squadron with Counter but it's fragile so I have mixed feelings about getting value from Counter" is completely solved by Snipe. You're fast, you're hot death to squadrons, DIS-T81 will happily hide in obstacles all day, you can go after ships if you've got nothing better to do and you've got a scatter to keep you safe. If it's safe to go into cleanup mode, you can eschew Sniping and go after generics like normal with your slightly higher average damage from using the regular attack. This is an all-around amazing squadron and I'd strongly recommend adding it first before any generic Tri-Fighters.
 |
| "Wait, we have missiles?" |
The Phlac-Arphocc Prototypes (hereafter Aflac Prototypes)
 |
| In space, noone can hear you scream during these commercials. |
Anyways, the Aflac prototypes have a Mauler-Mithel-esque effect. A few notes about it:
- The trigger is the end of an enemy squadron activation. That has a couple ramifications:
- If the enemy squad activates and does nothing (to avoid Counter, for example), it still activated and at the end of that activation it takes 1 damage.
- If the enemy squad moves in during the Squadron Phase and ends its activation at distance 1 it will take 1 damage.
- If the enemy squad attacks Aflac it's entirely possible that Aflac will be destroyed prior to the end-of-activation trigger which would save them from Aflac's Wrath.
- Aflac's damage isn't an attack, so defense tokens won't help against it.
- The damage affects all enemies at distance 1, not only those engaged with Aflac like Mauler Mithel does when he hops around.
Successfully using the Aflac Prototypes is a balancing act: on one hand, you want to be at distance 1 of as many enemy squads as you can to maximize the damage potential. On the other, you'd really prefer to stay alive and Separatists don't have Escort squadrons to help you out there. If Aflac gets buried in a squad furball he'll be public enemy number one and quickly destroyed. The easiest option to thread that needle is to use obstacles near a squad engagement to position Aflac at distance 1 of a number of enemy squadrons while staying obstructed to their attacks and capable of leaving in the future if he needs to. You'll want other friendly squadrons to pin down those enemies, though, so they can't leave before Aflac gets his insurance bills hits in. If no such perfect opportunity presents itself, it's probably best to go for only engaging 1-3 enemy squadrons where you're varying degrees of safe and working your way into or out of the heart of a furball as necessary.
Otherwise, Aflac has the same statline as DIS-T81: his anti-squadron attack is a little stronger in terms of damage but he will struggle a bit more against aces, paradoxically most so against scatter aces where his Aflac's Wrath ability will usually be the most impactful (as scatter aces have low hull and hate when things damage them without letting them scatter). In that situation, using AI to add a blue due when necessary and using Swarm to fish for accuracy results is your best bet. If you can get 1-2 damage to stick to a scatter ace you're well on your way to killing them off with your special ability.
I wouldn't consider Aflac Prototypes to be as much of a no-brainer as DIS-T81, but for +8 points over a regular Tri-Fighter, he's still pretty good if you need some more anti-squad muscle and you've got enough other fighters to keep him relatively safe while he does his job.
Tri fighters punch way above their weight class when used in a furball and make an absolute mess out of y-wing squadrons.
ReplyDelete