

 |
| The first of many pictures taken at my computer! Read along at home and then watch me explain the verbosity! |
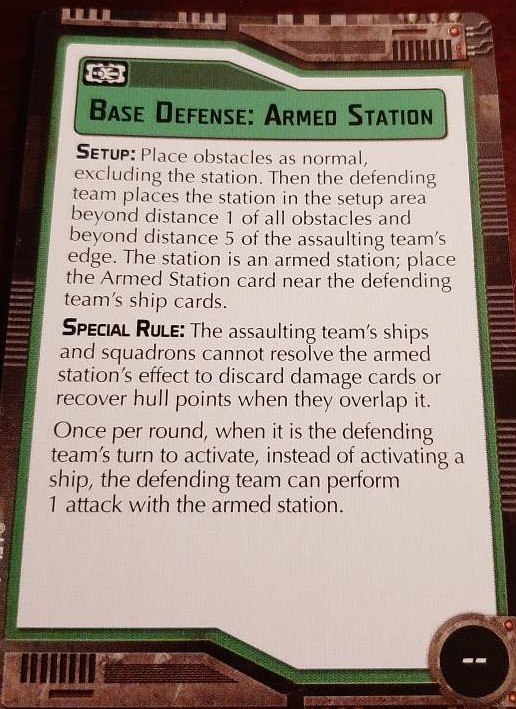
This is one of the 3 you can choose from when you base a planet. Why pick this one? Free activation, free shot at ships or squads (with a Pelta front arc, so it ain't that bad. 3 damage expected total on average against a ship), and it prevents your opponent from healing on the station. It also allows you to hit that ship that is trying to run past you or has JUST one more hull point remaining. Finish 'em off, buddy!
How to play it?
If you're defending, they're assaulting your base. De-fence (stomp stomp), de-fence (stomp stomp). It's an extra activation for you, and it can put more damage into your opponent. Your job is to keep your base and your force alive, so try to use the initial obstacle placement to funnel them into overlapping fields of fire from your ships and base. If you're attacking it, you just got to put 13 damage into it. Easy, right! It's not like it awards you no points for dying and keeps shooting you even if you'd rather it picked another target.... 13 damage is going to take 2 solid shots or 3ish unspectacular ones. Which is 2-3 shots NOT going into your opponent's ships. Great. If you can kill his ships, go for those. If you can't, go for the win. All you need is a win and you get the swag.
 |
| Easy to get, please don't screw it up |
You get 40 points of non-unique squadrons. 4 free Y-wings/TIE bombers! Now make use of them. Biggs Notes (below all in orange) Note that the squadrons are added to your fleet for purposes of rewards / exp calculations. Also they're potential targets for your opponent to swat out of the sky for points. So, potentially some real power added to your list, but also a danger.
How to play it:
It's extra squadrons, so either kill the squads with yours or blow up his ships. And that applies to both sides here.
Base Defense: Ion Cannon
You get to place 3 objective tokens that function ALMOST identically to the Planetary Ion Cannon one. Roll 4 blue dice, crit exhausts a defense token.
How to play it:
 |
| And behind door number 3? |
You get to place 3 objective tokens that function ALMOST identically to the Planetary Ion Cannon one. Roll 4 blue dice, crit exhausts a defense token.
How to play it:
Notice I said almost? Yeah, you need to discard a command token. The Ion Cannon token doesn't discard, but the command token does, so you need to keep paying for it if you're gonna use it. So make sure you CAN pay for it in order to get "3" attacks per round from one ship. If you're fighting it, Strategic squads can move the tokens. I've been on the receiving end of it, it sucks. Otherwise, the tokens don't do anything if you can't turn them on or aren't within 3 of them. So, stay away or close in order to get them going. Also, as was pointed out to me by IrishMadcat, if you can get Spynet tokens, that vastly helps the fact out that you have to deploy everything first. Veteran Ships are going to be the key here in ensuring that you have a steady supply of tokens to mulch your opponent.
Double Agent:
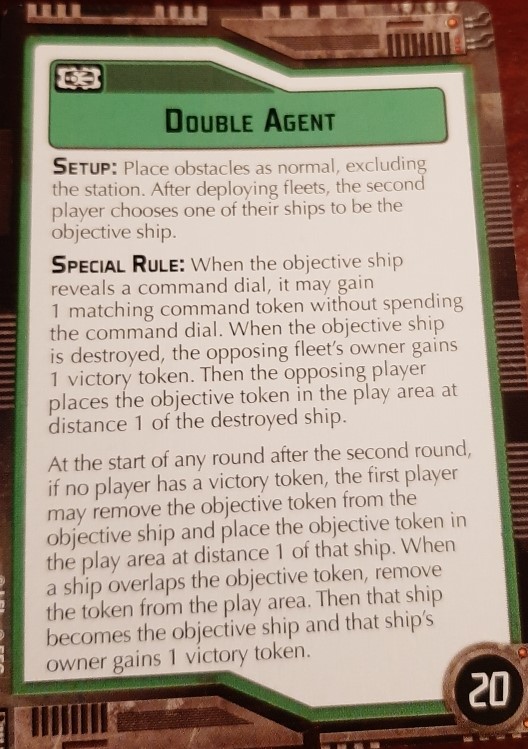
This is like a weird Most Wanted. Start of game, the defender (player 2) chooses one of his ships to be an objective ship. The objective ship gets the Raymus Antilles power, gaining a free token whenever it reveals a dial. Fancy. But the ship is worth 20 more points (with a fancy victory token, hey Jyn Erso) if it blows up. Oof, scary. When the objective ship dies, you get to place the objective token distance 1 from its exploding corpse to go "help" another ship.
Round 3 or later, the first player can remove the objective from the ship and place it in the play area. When a ship overlaps it, it gains the token and becomes the new objective ship. This can help or hurt you as you can actually run over it yourself. Good luck!
How to Play:
 |
| Kallus is TOTALLY a loyal friend of the Empire! Just like Hondo! |
This is like a weird Most Wanted. Start of game, the defender (player 2) chooses one of his ships to be an objective ship. The objective ship gets the Raymus Antilles power, gaining a free token whenever it reveals a dial. Fancy. But the ship is worth 20 more points (with a fancy victory token, hey Jyn Erso) if it blows up. Oof, scary. When the objective ship dies, you get to place the objective token distance 1 from its exploding corpse to go "help" another ship.
Round 3 or later, the first player can remove the objective from the ship and place it in the play area. When a ship overlaps it, it gains the token and becomes the new objective ship. This can help or hurt you as you can actually run over it yourself. Good luck!
How to Play:
Well, if you're attacking, remember your opponent chooses his initial Double Agent ship. So if you want it to be another one, he needs to both be close enough to kick it out distance 1 AND have another ship run it over. And he gets a free extra token while he does it. Your agent has to keep up appearances, helping the other guys and all. Concentrate all firepower on that (checks notes) combat flotilla! Feels great, don't it?
If you've got the Agent, play defensively, kill what you need to, and be prepared for the tokens to desert you just when you need them. Oh, you thought round 4 that you were going to get both the token and dial to engineer those shields back? Guess who jumped out the airlock? 20 extra points is nice, but ensuring you're dead is well worth not getting those. This is a Jyn Erso mission in that if you can force your opponent to run over the token you can gain 20 points from raiding them. Easy peasy right? I've had luck jumping the Agent out of the airlock fairly early, and forcing my opponent to hold in place to defend it. "Strategic" Token Movement like VCX's and Lambdas are big here - Ally token them in if you don't have 'em naturally.
Hired Scum:
No stations! Second player places all obstacles, and then puts objective tokens on 3 of them. The second player then gets to choose 40 points of non-unique, irregular (one flight stand: HWKs, Firesprays, Aggressors, YT2400s, etc) Scum Squadrons. Round 2 and later, deploy 2 of those squadrons at distance 1 of A token, and then remove that token and one of the other ones (this means that you can bring the 3rd one in from the last token in a later round).
The first player (the one without the Scum) gets to reroll 1 die when attacking a Scum for each friendly squadron at distance 1 of said Scum. So if my generic YT is engaged with 2 total TIEs, you get the swarm reroll and the 2 die reroll in any order. If you're only engaging it with 1 total TIE, I still reroll 1 die as needed.
How to play:
If you've got the Agent, play defensively, kill what you need to, and be prepared for the tokens to desert you just when you need them. Oh, you thought round 4 that you were going to get both the token and dial to engineer those shields back? Guess who jumped out the airlock? 20 extra points is nice, but ensuring you're dead is well worth not getting those. This is a Jyn Erso mission in that if you can force your opponent to run over the token you can gain 20 points from raiding them. Easy peasy right? I've had luck jumping the Agent out of the airlock fairly early, and forcing my opponent to hold in place to defend it. "Strategic" Token Movement like VCX's and Lambdas are big here - Ally token them in if you don't have 'em naturally.
 |
| I was going to make a "Hi, Red!" joke here, but now you're reading this in Morgan Freeman's voice, huh? |
No stations! Second player places all obstacles, and then puts objective tokens on 3 of them. The second player then gets to choose 40 points of non-unique, irregular (one flight stand: HWKs, Firesprays, Aggressors, YT2400s, etc) Scum Squadrons. Round 2 and later, deploy 2 of those squadrons at distance 1 of A token, and then remove that token and one of the other ones (this means that you can bring the 3rd one in from the last token in a later round).
The first player (the one without the Scum) gets to reroll 1 die when attacking a Scum for each friendly squadron at distance 1 of said Scum. So if my generic YT is engaged with 2 total TIEs, you get the swarm reroll and the 2 die reroll in any order. If you're only engaging it with 1 total TIE, I still reroll 1 die as needed.
How to play:
Bring good groups. If your opponent is squadronless, bombers aren't a bad idea, but make sure you have some sort of Escorts for them if they do have squadrons. The Scum targets get many rerolls against them so they are not long for this world, and giving up 40ish points ain't easily recovered from. If you're fighting it, hit the scum because they crumple. This is a strong Attacking objective, because not only does it give you a great way to mulch enemy squadrons for points, but the squadrons they add are temporarily added to their fleet total. HELLO understrength bonus!
Options you can bring:
HWKs (12)
YT2400s (16)
YT1300s (13)
Scurrgs (16)
Lancers (15)
VCXs (15)
It's a HWK, a YT1300, and another 15 point or lesser squadron, 2 HWKs and a 16 pointer, or 2 squadrons of your choice. Basic answer with THAT is 2 YT2400s, but depending on the rest of your squadron makeup, I'm sure Biggs (the squadron, not our co-author) could use 2 more YT1300s to pass damage around with. A pair of VCX's is only 30 points your opponent can score, and more importantly 16 hull to chew through.
Firesprays (18)
Gauntlets (20)
Aggressors (16)
Jumpmasters (12)
Lambdas (15)
Decimators (22)
YV-666 (15)
Take 2 Jumpmasters and a 15-16 point squadron or any 2 non-Decimator squadrons of your choice. Decimator/Firespray is mean in both hull and potential damage.
Holonet Override
Station doesn't heal, bro! Instead it's just a bank of victory points. The first player can spend engineering points at distance 2 of the station to get 10 endgame scoring points for each 2 engineering points he spends. The second player spends 2 engineering points to remove those endgame victory points, and his ships get tokens for removing the first player's points. So the first player spends all his time dumping engineering into the station, and the second player thanks you for helping his lead out. There have to be tokens there to remove, of course, for the second player to take.
How to play:
Options you can bring:
HWKs (12)
YT2400s (16)
YT1300s (13)
Scurrgs (16)
Lancers (15)
VCXs (15)
It's a HWK, a YT1300, and another 15 point or lesser squadron, 2 HWKs and a 16 pointer, or 2 squadrons of your choice. Basic answer with THAT is 2 YT2400s, but depending on the rest of your squadron makeup, I'm sure Biggs (the squadron, not our co-author) could use 2 more YT1300s to pass damage around with. A pair of VCX's is only 30 points your opponent can score, and more importantly 16 hull to chew through.
Firesprays (18)
Gauntlets (20)
Aggressors (16)
Jumpmasters (12)
Lambdas (15)
Decimators (22)
YV-666 (15)
Take 2 Jumpmasters and a 15-16 point squadron or any 2 non-Decimator squadrons of your choice. Decimator/Firespray is mean in both hull and potential damage.
 |
| Alternate rule: every time you want to put a token on the station you need to play an entire game of Netrunner to hack them |
Station doesn't heal, bro! Instead it's just a bank of victory points. The first player can spend engineering points at distance 2 of the station to get 10 endgame scoring points for each 2 engineering points he spends. The second player spends 2 engineering points to remove those endgame victory points, and his ships get tokens for removing the first player's points. So the first player spends all his time dumping engineering into the station, and the second player thanks you for helping his lead out. There have to be tokens there to remove, of course, for the second player to take.
How to play:
Every engineering point spent on this is an engineering point that isn't spent repairing their ship, nor is it another command they could use. They can do it with tokens, of course, but it's a fair amount going on to get the points pinata going. It's on the first player to get to the station to start scoring points off of it, so it's kind of like a weird "defend the station" scenario. Which means you can predict where people are going to be. Also, this only works with 2 point increments, so unless you have an engineering ability, a token on a command 1 ship isn't going to do it. In practice, this turns into just a 'FIGHT AROUND THE STATION" game, but with the option to dump engineering commands into running up the score once you've safely won. That being said, 2nd player can both place and remove tokens, so for double the cost (4 engineering points) it can place / remove 1 token and get 10 points,
Pilot Defection:
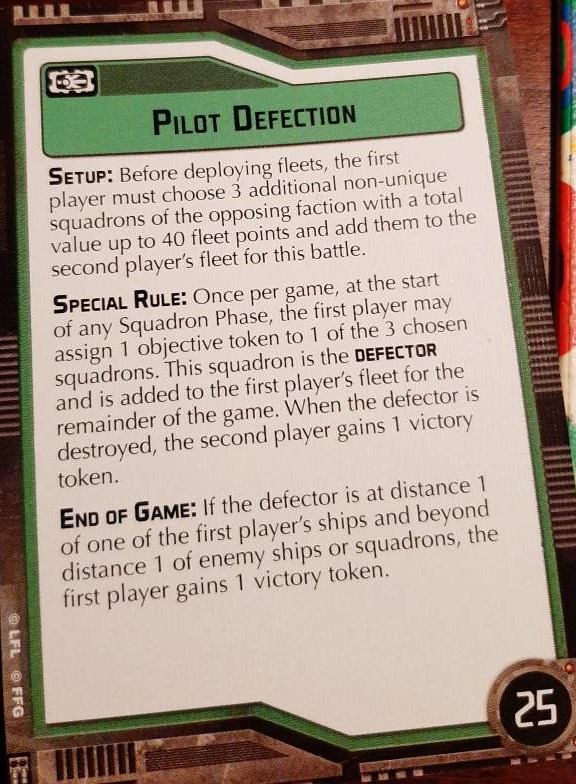
Choose 3 non-unique squadrons (40 points or less) of the OPPOSING faction. One of them is going to be hanging out with you soon! Once per game, 1 of those 3 squadrons defects and joins the winning, cool guy side (it's yours). If he lives and is by one of your ships (and none of theirs) end game, you get 25 points. If he dies, he's worth 25 to them.
How to play:
 |
| Also loyal: Wedge Antilles TIE fighter pilot! |
Choose 3 non-unique squadrons (40 points or less) of the OPPOSING faction. One of them is going to be hanging out with you soon! Once per game, 1 of those 3 squadrons defects and joins the winning, cool guy side (it's yours). If he lives and is by one of your ships (and none of theirs) end game, you get 25 points. If he dies, he's worth 25 to them.
How to play:
Depending on what you brought, you can either bring 2 potentially good choices for defecting to your side, or you bring 1 obvious choice and 2 things you're hoping to beat the points out of. Easy examples here are either 2 VCXs and a Z95 or 2 TIE bombers and a Decimator. If you think you can kill the other 2 squads with what you've brought, go for the latter. If you're not sure what's going to make it out of this fight, try to make sure you have SOMETHING left to grab at the end there.
If you're about to lose a pilot, make sure that you command your guys (even the Rogues) and end them in double flak arcs. Don't make it an easy loss of your own guy, so that when the next turn starts (he defects in the Squadron phase) he's eating a BUNCH of dice for doing so. Geek's got the basics down, so let me just say this: Go old school, remember the TIE Fighter video game, and take 3 TIE Interceptors. Then you can have your opponent say, when you trigger the change: "Enough of this charade! Alpha 2 and 3, kill Alpha 1!" I'm also a big fan of 1 obvious, 1 okay, 1 fodder. Think: 1 YT-2400, 1 HWK, 1 Z-95. You know the Imperials want that YT, but if the HWK is the one that can get snapped up, and move to safety...
Prototype Recovery:
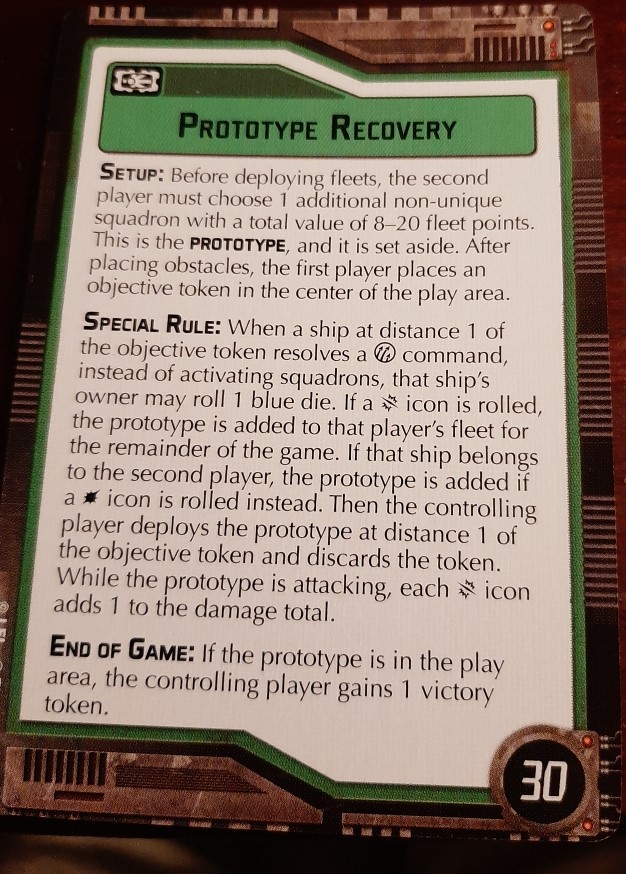
It's a lot like that one episode where Hera gets a B-wing! Kinda! The second player picks one non-unique squadron 8-20 points (no Decimators or Z95s) and plop an objective token in the middle of the map. If you do a squad command at distance 1 of the token, roll a blue die. First player gets the prototype on crits, second gets it if they roll a hit (ONLY, for both of them). The prototype has the Vader ability where crits count as damage (but aren't bomber). If he lives, whoever controls the prototype gets 30 points. Killing it gives you the squad points it's worth. Winning this objective also contributes to the climactic battle....
How to play:
If you're about to lose a pilot, make sure that you command your guys (even the Rogues) and end them in double flak arcs. Don't make it an easy loss of your own guy, so that when the next turn starts (he defects in the Squadron phase) he's eating a BUNCH of dice for doing so. Geek's got the basics down, so let me just say this: Go old school, remember the TIE Fighter video game, and take 3 TIE Interceptors. Then you can have your opponent say, when you trigger the change: "Enough of this charade! Alpha 2 and 3, kill Alpha 1!" I'm also a big fan of 1 obvious, 1 okay, 1 fodder. Think: 1 YT-2400, 1 HWK, 1 Z-95. You know the Imperials want that YT, but if the HWK is the one that can get snapped up, and move to safety...
 |
| Anyone seen Quarrie? |
It's a lot like that one episode where Hera gets a B-wing! Kinda! The second player picks one non-unique squadron 8-20 points (no Decimators or Z95s) and plop an objective token in the middle of the map. If you do a squad command at distance 1 of the token, roll a blue die. First player gets the prototype on crits, second gets it if they roll a hit (ONLY, for both of them). The prototype has the Vader ability where crits count as damage (but aren't bomber). If he lives, whoever controls the prototype gets 30 points. Killing it gives you the squad points it's worth. Winning this objective also contributes to the climactic battle....
How to play:
Get it or kill it. I suggest a YT1300 or YT2400 (tanky and helping the blue dice do damage is nice) for the Rebels or a YV666, Phantom, or Decimator for the Imperials. That Phantom is deceptively frightening when crits count for it. Just try not to let your opponent steal it, or you're in for a taste of your own sad medicine. Not a fan of this objective. Ugh. As first player, I have a plan to let my opponent get the prototype, and immediately end it. As second player, my plan is to take something with Escort so I can burst it down if I miss out on it. X-Wing / TIE Advanced.
Recruit Allies:
The first player chooses up to 50 points of irregular (one flight stand) squads or upgradeless ships. This is an OR, so no Torp Hammerhead and single YT2400 Rebels. These Allies are lurking near an objective token, and the allies show up for whoever has more force at distance 1 of it at the end of the 3rd round. The player who gets the allies gets to add their remaining points TO their score at the end, so either kill their stuff or steal it for yourself. I'm not sure how exactly 3 jamokes in YT2400s are trying to decide between the two sides, but sure, go for it!
How to play:
 |
| Cause you gotta have friennnnnnnnnnnnnnnnnnnnnnnnnnnnnnnnnnnnds |
The first player chooses up to 50 points of irregular (one flight stand) squads or upgradeless ships. This is an OR, so no Torp Hammerhead and single YT2400 Rebels. These Allies are lurking near an objective token, and the allies show up for whoever has more force at distance 1 of it at the end of the 3rd round. The player who gets the allies gets to add their remaining points TO their score at the end, so either kill their stuff or steal it for yourself. I'm not sure how exactly 3 jamokes in YT2400s are trying to decide between the two sides, but sure, go for it!
How to play:
Kill their allies OR get to that objective token and steal them for yourself. An upgradeless ship is either a raider, hammerhead, or CR90. Or 2 flotillas in some form, I suppose. The squadrons can either aid in your fight or just start punching ships. I'd guess it's going to end up as 3ish squadrons as it's harder to bleed points out of them, but don't take my advice/thoughts as gospel. If/when you get the allies, and you can keep them alive, that might be better than trying to blow them up. Just realize if you're zooming across the map to get it, they're going to be waiting for you to jump there. It's also END of the round, so you need to be alive. Strategic, Strategic, Strategic.
Steal Supplies:
6 objective tokens on the card! The second player wants them all there, the first player has made an attack on second player territory to steal them! All you need to do is get to the station and reveal dials! Easy peasy right? I'm SURE they won't be shooting you while it happens! SURE of it! You can place the tokens on either the ship that reveals it or an irregular squadron (one stand) within distance 1 of your ship. Then you need to LEAVE. It all comes down then to who can get more supplies all while killing the other guy's stuff, too! Because OF COURSE the second player gets points if/when he blows up your ships that HAD the supplies.
How to play:
 |
| We "liberated" them. Like we "freed" the stormies from "being alive" |
6 objective tokens on the card! The second player wants them all there, the first player has made an attack on second player territory to steal them! All you need to do is get to the station and reveal dials! Easy peasy right? I'm SURE they won't be shooting you while it happens! SURE of it! You can place the tokens on either the ship that reveals it or an irregular squadron (one stand) within distance 1 of your ship. Then you need to LEAVE. It all comes down then to who can get more supplies all while killing the other guy's stuff, too! Because OF COURSE the second player gets points if/when he blows up your ships that HAD the supplies.
How to play:
Either defend well and line up some attack angles for where you're going to be, or be prepared to be running around and getting to the station late and grab some more. The 6 tokens on the station are worth 90 points, so factor that in if you plan on just blowing up the other guy; second player starts 90 points up. This is a Jyn Erso mission in that she can turn your Imperial thief's supplies back into points for you. But she CAN'T help you as the Rebel "liberator" as the supplies are on the card until they're on your ship. You're probably playing this to clear a condition. Sometimes you've just gotta take the L and move on. Though irregular squadrons that like this objective: VCX's / Decimators have hull, anything with Intel can run. Also your opponent can't be near you if all his ships are dead.
Volatile Cargo:
Three of the second player's ships/squadrons get a special objective token. The first player automatically gets a victory token if you can't, so don't take this if that's gonna happen. While an objective ship or squadron is defending, it just GETS to reduce the damage total by 1. If the defender is destroyed by this attack, everyone within distance 2 of the defender takes damage equal to half the hit icons in the attack pool rounded up, and then the first player gets 1 victory token. The second player gets TWO tokens for every objective ship at distance 1-3 of the first player's edge.
How to Play:
 |
| Ugh, THIS guy |
Three of the second player's ships/squadrons get a special objective token. The first player automatically gets a victory token if you can't, so don't take this if that's gonna happen. While an objective ship or squadron is defending, it just GETS to reduce the damage total by 1. If the defender is destroyed by this attack, everyone within distance 2 of the defender takes damage equal to half the hit icons in the attack pool rounded up, and then the first player gets 1 victory token. The second player gets TWO tokens for every objective ship at distance 1-3 of the first player's edge.
How to Play:
Generally don't? Your squadrons that aren't doing 2 plus damage against ships or 2 plus damage AFTER defense tokens are spent against squadrons are doing nothing. I hit this last campaign against someone with Cienna and Whisper and immediately moved away from it. IF you have a large base ship that can blow apart smalls AND they won't get around you AND you can deal with the "one less damage" effect on EVERY SHOT for FREE, then yeah go for it. I look it and see a giant NOPE on my end. "Oh, you brought a squad list? Shucks, my Assault Frigate and MC30 are gonna take 2 of those tokens and gain 4 when I get to the endzone. Oh, you're squadronless? Guess your flak is meaningless, cool thanks." Again, if you can be VERY SURE that you're going to blow apart at least 2 of their ships/squads, the objective is neutral, and then its a damage race. If all 3 of theirs escape that's 90 points total, and they're just trying to get into your endzone. How do you feel about Blockade Run with half a fleet? What Geek said. I haven't played this one, but you'd BETTER have a good plan going in or you're gonna have sad times. Best against a list where you KNOW you can score two of them no matter what is chosen.
And that's all our green friends! Good luck and make sure to pick the right ones!
And that's all our green friends! Good luck and make sure to pick the right ones!
Does Volatile Cargo work that way? My interpretation was that if you choose to reduce damage with its ability, regardless of whether the ship explodes or not, the opponent gets the victory token. This is because of the sentence structure: If X, then Y. Then Z if explode. Then O.
ReplyDeleteMade it much more interesting and reasonable. Basically you can dump your cargo containers in front of the incoming fire, but if you do you are getting less cargo.
I like your interpretation of it, but I read it as you only get the token if you blow them up. It's a second player objective, so it SHOULD give them the benefit. I don't think you get the token unless they die, which you can do with enough damage. My issue is that I hit that Cienna/Whisper bit, AND I hit it at Mygeeto where I wanted the unique. Feel free to try your version out and let me know how it feels for both sides!
DeleteI did play a match, I was the second player. I was very skeptical after the first read of the objective: Basically my objective ships/squadrons were immune to bombers, flak and long-range fire, which felt uncomfortably advantageous for me. (Not that it mattered; I was facing an Interdictor, VSD I and a bunch of TIE Fighters). But the second interpretation felt more reasonable and made a few interesting decisions: Is giving the opponent 15 points a good price for saving my ship now? My Hammerhead takes a massive hit and dies, is 3 damage to the VSD worth the 15 points?
DeleteDon't remember how my opponent felt about it though.
Act II, Turn 3 - Leading the Rebel fleet against Conord Dawn Base and it's Armed Station...
ReplyDelete"f you can kill his ships, go for those. If you can't, go for the win. All you need is a win and you get the swag."
Yeah. That's going to be the idea, shooting down that demolisher and her Victory friend...
:)
http://armadawarlords.hivelabs.solutions/view_list.php?token=224033&key=48c43e6907324263b36ce5dfb9cf64b1
Hello, does the Recruit Allies trigger the understrength bonus? It almost looks like that objective has a fleet point counting override.
ReplyDeleteGimme a few days, I'm not home at the moment where my rulebooks are, but I will address this.
DeleteI don't see anything saying it DOESN'T, so I think you still get to do it alright
Delete