
 |
| TIE Fighter squadrons not included (but recommended!) |
- 11 hull points, the highest available currently in the game.
- 4 front, 3 side, and 2 rear shields (for a total of 12 shield points).
- 1 brace, 2 redirects, and 1 contain defense token. This is a very similar defense token suite to the VSD but adds the situationally-useful contain. This suite will stand you in good stead against bombers and the occasional big ship attack but it does not like getting peppered at long range consistently and the one brace is prone to getting locked down by accuracy results.
- Lots and lots of upgrade slots, differing slightly (but importantly!) between different variants.
- A generous front hull zone with 7 or 8 dice and a wide firing arc.
- Engineering 4, which is adequate for their size.
- Command 3, which means they're going to need to plan ahead for their command-setting.
- A maximum speed of 3 and an adequate amount of maneuverability. Nothing amazing there but for a large ship it's not bad at all.
In short, you get a huge chunk of ship in an Imperial-class Star Destroyer and it's costed as such - 110 points minimum for an ISD-1 up to 120 points maximum for an ISD-II, with the Kuat(ISD-K) and the Cymoon(ISD-C) at 112.
Basic usage recommendations
Ideally, you'll want to apply your front arc to enemies as consistently as possible and achieving this is similar to using a VSD except you aren't as restricted in your speed and maneuverability: navigate commands are still your friends and you'll find speed control and leading your enemies to be invaluable. In particular I find it's common for newer players to crank their speed up too high and overshoot enemies and then have a hard time turning around later on. In general, I'd recommend considering speed 2 your default speed, but keep an eye out for opportunities to stay on target at speed 1 or pounce on prey at speed 3.
ISDs have an awful lot of everything (attack dice, hull, shields) but they can't tank an entire enemy fleet. In particular, the damage really starts to pile up when their defense tokens get overheated and their shields are dropped. Do your best to send them after an appropriate amount of the enemy fleet. Sailing them right into the middle of the enemy fleet will nearly always result in a very dead ISD fairly quickly.
Because an ISD is such a large portion of your fleet, they often enjoy being supported by numerous other cheap ships, such as Gozantis, Arquitens, and Raiders, that can mind their flanks, help with some support duties, and provide cheap ship activations to make up for the expensive activation provided by the ISD. I generally do not recommend using more than one ISD in a 400 point game (although two in a 500 point game is a blast). It should be noted that running two in a 400 point fleet can absolutely be done, but it requires a high level of skill to make it work consistently against decent opponents.
Similarly to other highly destructive ships, I recommend deploying the ISD as close to last as possible. Knowing where the meat of your opponent's fleet is can set the ISD up very well to both avoid problems of its own and cause them for your opponent.
Try to avoid over-upgrading your ISD. It's a ship that can really get a lot of mileage out of upgrades but because of its numerous upgrade slots and endless hunger for more upgrades you can go overboard and wind up with a 150+ point monstrosity (not counting the commander if it's your flagship) that starts seriously cutting into the points available for other necessities like additional ships and squadrons.
Let's talk about officers
This article is split up a bit differently from many of my other ship articles because it's covering 4 different types of ISDs that are split into groups of 2. Because of that, we cover a lot of the upgrade slot items with the specific ISD variants. That said, officers options are something most ISD builds have in common, so we may as well cover most of the good options here.
Defensive officers
- Expert Shield Tech. Turning those two redirects into possible mini-braces can really help prolong your lifespan. It's not flashy but it's also not expensive and it's handy against small ships and squadrons especially.
- Captain Needa. Here's the cheap default defensive officer. Needa's not flashy, but turning a contain into an evade for 2 points is pretty swell given evades improved in 1.5.
- Minister Tua. If your ISD variant lacks a defensive retrofit slot, she's a pretty compelling choice to increase your durability.
- Reeva Demesne. She's kind of a mirror of Minister Tua in that she's best on ISDs that already have a defensive retrofit slot so she can benefit from and synergize with the increased tankiness to get her effect triggering.
Offensive officers
- Intel Officer. Nothing wrong with making it abundantly clear that you really hate brace and scatter tokens and they need to disappear very quickly.
- Admiral Ozzel. Similar to Skilled First Officer, Ozzel is cheap and has a handy one-time benefit by letting you jump the gun a bit with a speed-1 maneuver at the start of the game. The benefits for a brawler ISD are clear, but this effect can also be useful on artillery ISDs, too.
Command officers
- Skilled First Officer. When in doubt, he's handy and only 1 point. If you aren't taking any other officer, Yelling Hat Man will do.
- Commander Vanto/Wulff Yularen. Your choice of 7 point Imperial token officer, basically. They each have their selling points but either is great for supplying tokens to power fleet command upgrades, refresh crucial upgrades that consume tokens to ready, or trigger command-dependent upgrades you don't feel like slotting in a full dial for.
Titles
ISDs have a lot of titles available to them and they can all be useful in the right builds, although some are a lot easier to get working than others. The Seventh Fleet generic title requires building a fleet around, so it won't be mentioned here but you can read up on it in the Imperial-specific upgrades article.
 |
| Hands-down winner of the Armada 1.5 "gold to garbage" award. |
Avenger rules time!
- Because Avenger exhausts to use, it's capped at one use per activation (assuming it's not exhausted prematurely somehow).
- The effect is used during the Resolve Attack Effects step.
- The defender can spend as many readied/green defense tokens as they like, but they're limited to only one exhausted/red defense token.
- This does not prevent effects like Commander Agate that resolve defense token effects but don't actually spend those defense tokens.
Avenger is binder fodder now in Armada 1.5 and I urge you to accept this fact and move on with minimal tears shed - there are lots of other good ISD titles (coming shortly after this disappointment) and Avenger had some unpleasant uses back in 1.0 and got nerfed into oblivion. That's a hot take for sure, but let me lead you through why I feel this way: for Avenger to meaningfully do anything, your opponent needs to want to spend two or more different types of exhausted defense tokens against one attack and for that to actually make a meaningful difference. Getting all those things to line up is extremely difficult. Sure, a ship that's about to get walloped with an exhausted brace and redirect will want to spend the two together but the choice of which to spend when it comes right down to it isn't hard: it's going to brace. There's really no way to stop your opponent from using the most high-impact defense token when you use Avenger, so your attacks are still going to get braced or scattered or whatnot and there's nothing you can do about it beyond accuracy icons, which is something any ISD could do without wasting its title slot.
Again, I'm sorry that it's terrible now but that's okay. We've got lots of good stuff to get to, still. Just forget about Avenger with Boarding Troopers and/or Sloane and move on with life is my advice.
 |
| Currently in fierce competition with the word "Rogue" for "most-frequently-misspelled word in Armada" |
Chimaera adds a fleet command slot to your ISD's upgrade bar but you can't take it if you had one already (sorry Cymoons). It also allows you to change your equipped fleet command out for a different one at the start of the Command Phase, so you can make use of it in the upcoming ship phase. A few things worth noting:
- You still need to spend the points to equip a fleet command upgrade to the ship. Chimaera gives you the slot, not the card.
- Because you can change out fleet commands, it's best to equip one of the 5-point fleet commands and then swap it out for a 6-point fleet command if that's the one you actually wanted to use.
- This feels very clever until you remember you paid 4 points for Chimaera, so you're still spending 3 more points than someone would just filling that slot normally 😉.
- The rules prohibit you from having two of the same unique-named anything in your fleet at a time, so you can't use a Cymoon and a Chimaera ISD to sneak in two copies of the same fleet command by changing out Chimaera's originally-equipped fleet command for another copy of the Cymoon's fleet command
- If you've discarded Chimaera's current fleet command for its effect (not using a token, just discarding it), then you can no longer swap around your fleet command upgrades using Chimaera, as the fleet command upgrade has already been discarded.
- FFG clarified in the FAQ that Chimaera title simply replaces the previous fleet command, so you can cycle through different fleet commands and even return to an earlier-used one. If Chimaera is destroyed, only the cost of its current fleet command counts against it, not its original fleet command.
The more complex way to use Chimaera is with a commander like Thrawn or Tarkin that can set the tone for what your entire fleet is doing that round. When used in this way, your fleet leverages the fleet-command-swapping element of the upgrade more than the more straightforward method of using it for one specific upgrade. When your entire fleet gets a repair token from Tarkin and your ISD resolves Shields to Maximum, it's going to be a very repair-happy round for your fleet, and you can turn around and resolve Intensify Firepower with fleet-wide concentrate fire token next round if you want to pivot from defense to attack.
 |
| Bringing devastation to itself and enemy ships too sometimes! |
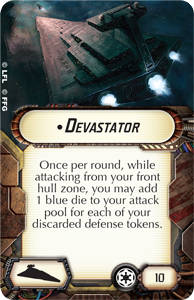
Three things to note first about the Devastator title:
- It works once per round, so you can't use it multiple times in one activation.
- The only restriction is that you are attacking from your front hull zone, so it can work at long range.
- It can be used against any target, so you could add some extra blue dice while attacking one squadron if necessary.
Overall, I'm more comfortable with Devastator on an ISD with a defensive retrofit slot (whether naturally or from Minister Tua) so you can use Electronic Countermeasures, which synergizes with Devastator. In the early game, ECMs allow you to deliberately overspend your defense tokens reliably, as canny opponents will realize what you're trying to do and use accuracy results on your exhausted defense tokens. Once you've reached just a brace and redirect left, ECMs allow you to more comfortably rely on using them to keep yourself alive.
To get to the point, the main benefit of Devastator is that if you can get it working, it adds a substantial amount of dice for its cost. Compare the points cost of most Modification upgrades to 10 points for the possibility of adding 2-4 blue dice to an attack from your front arc at any range and the hefty expense of Devastator starts to make more sense. It's very dangerous, however, and you need to manage your risk very carefully or risk being complicit in destroying your own Star Destroyer. With that said, it's important to understand when it's time to step on the gas with Devastator after destroying its targets to put some space between it and enemies hoping to converge on it and overheat its diminishing defense tokens.
 |
| Relentlessly loving Skilled First Officers since wave 4. |
Relentless has a nice simple benefit for a low cost. It effectively turns your ISD into a Command 2 ship that has all the benefits of being Command 3. The difference between correctly assigning commands to a Command 2 versus a Command 3 ship is quite substantial - seeing what you expect to happen next turn (and setting a command for that) isn't too tough, but trying to prepare for the turn after that one often relies on numerous variables that won't always turn out quite like you were hoping which can result in some non-ideal command choices.
Relentless isn't too flashy, overall - it's not going to really define the Star Destroyer like the more expensive titles will, but it's the cheapest ISD title and it doesn't require the kind of additional support (which costs more points) like the other titles do to get working well. Relentless is certainly happy to have a Skilled First Officer as its officer for all the same reasons Command 2 ships love Skilled First Officers, but ISDs have very hotly contested officer slots and it's still quite content simply being a fake Command 2 ship.
 |
| "You exist because we allow it. And you will end because we demand it." |
Sovereign is Grand Moff Tarkin's flagship and it works very well with him, as you might expect, but is also handy in the right fleets with other commanders. There are a few rule clarifications we require before I discuss it any further:
- Sovereign triggers at the start of the Ship Phase (prior to activating any ships), just like Grand Moff Tarkin and fleet command upgrades, and you can resolve them in whichever order you please.
- Sovereign can work on itself, as the card doesn't specify other friendly ships.
- Because the original tokens are discarded, you can't save them with Wulff Yularen or the like that trigger on spent tokens.
 |
| The front arcs are a colorful rainbow of pain - a "painbow," if you will. |
I'm pairing off the ISD-I and Kuat, as they share several similarities in contrast to their longer-ranged siblings, the ISD-II and Cymoon (which we'll get to later). Why would you want to consider a close-ranged brawler ISD over a longer-ranged artillery ISD? Generally because they're cheaper (inherently and/or because they're less upgrade-hungry overall) and because their damage potential is higher than longer-ranged ISDs, although that potential is only realized at close range. Because both of these ISDs are shorter-ranged, they are often using their weapon team slot on some kind of offensive booster like Ordnance Experts or a boarding team that makes close-ranged fights with them particularly brutal. Ideally, your close-ranged ISDs want to get tougher juicier targets in their front arc and one side arc so they can eliminate them with a huge burst of damage.
Basic tips and tricks
As with any ship relying on black dice, brawler ISDs like going first if they can and are happy in fleets with a bid to try to make that happen. That said, however, their large base size combined with speed 3 and decent maneuverability makes it easy for them to clog up landing zones of their prey in ways that Gladiators and Raiders just can't, which makes them a bit more forgiving as second player than most black dice ships. For example:

The Assault Frigate, even at speed 3 with a navigate command for extra yaw, cannot find a place to land that is not overlapping the ISD, and thus it will be stuck in the ISD's front arc at short range while the ISD and Assault Frigate keep dealing one another hull damage for overlapping until the Assault Frigate or ISD is destroyed. This tactic will not work against more maneuverable small ships, especially those capable of getting up to speed 4, but in general it's a near-guarantee against any ship going speed 2 or less and against anything medium-sized or larger going speed 3 (you can still catch those light ships going speed 3, but it's very dependent upon positioning and their maneuverability so be careful). Basically, you're using the ISD's larger size to its benefit to keep ships from getting out of your front arc and you're quite content to mutually take damage when overlapping your prey because ISDs can take more punishment than most other ships in the game.
Okay, so let's say you've settled on a brawler ISD. Why take one over the other?

Compared to the Kuat, the ISD-I has some advantages:
- Longer-ranged side and rear arcs, which can help when you're closing in the early game or have been outmaneuvered.
- Squadrons 4, which is twice the Kuat's Squadrons 2 and allows the ISD-I to operate as a capable battle carrier.
- Also not to be overlooked are the two offensive retrofit slots, which can help in this role as well.
- It's also handy for equipping a boarding team as well as other "wish I had the space for them but don't usually make the cut" style offensive retrofits, like Phylon Q7 Tractor Beams or Proximity Mines.
- A turbolaser slot, which allows you to equip some mean defensive-token-hosing upgrades like XI7 or H9 Turbolasers.
- Slightly cheaper. Hey, sometimes those 2 points need to go somewhere else!
I won't lie to you: if all you want your ISD to do is get into knife-fighting range and throw black dice, the Kuat is likely more your speed but the ISD-I is still no slouch at close range and can be built into configurations the Kuat can't. Its Squadrons value of 4 is particularly remarkable as a point of differentiation in this regard, and you can expand on that or simply enjoy being able to fling 4 squadrons from your ISD once or twice a game while it's doing other things. Otherwise, the ISD-I wants the same kind of officers all large ships like, with some extra attention paid to Minister Tua; being able to sneak a defensive retrofit onto your ISD can be very appealing but isn't mandatory: choose your officer carefully!
Builds
Because the ISD-I lacks blue dice in its side arcs, one of the big immediate decisions for most builds is what to do with your ion cannon slot. Do you want Leading Shots to help guarantee your dice out your big 8-dice front arc (but not your side arcs) or are you willing to forego that for the defensive improvement at close range (where you want to be) from Point Defense Ion Cannons? I tend to prefer the PDICs at this point, but the shoot-and-scoot builds will tend to prefer Leading Shots to make sure they connect on their big activation.
Battle Carrier
Expanded Hangar Bay+Boosted Comms+Flight Controllers
This is for when you absolutely want your squadrons to hit like a ton of bricks, particularly your fighters. Activating 5 squadrons (6 with a squadron token) at up to long range and giving them all +1 blue dice on their anti-squadron attacks cleans up enemy squadrons pretty quickly. Effectively, this is a compromise option between running a dedicated brawler ISD and a Quasar carrier but for less total points, and it works well with commanders like Jerjerrod (who can help it maneuver while it commands squadrons), Thrawn (who can help it command squadrons while it does other commands), and Sloane fleets that want to try to squeeze their Quasar and ISD together to save points.
Boarding Party Version ISD-1.0
Darth Vader boarding team + H9 Turbolasers + Leading Shots
This build leverages the ability of the ISD-I to take a turbolaser upgrade by using H9 Turbolasers. With the Darth Vader boarding team your job is to find the meanest enemy ship you can, strip its best defensive upgrade away with Vader, and then lock down its brace token and pour damage right on in.
Blue Crits Guaranteed
H9 Turbolasers + Weapon Battery Techs + Heavy Ion Emplacements
HIEs are the correct choice here as your front arc has blue dice but your sides don't, so exhausting to use is just fine. This build exploits the H9 Turbolasers + Weapon Battery Techs combo to guarantee blue crits, so as long as you're attacking with your front or rear arc, that HIE crit is going off. It's definitely a janky build but it can get a lot of damage in, especially if you go pure aggro with Intel Officer for your officer.
Salvo Boat
Local Fire Control + Flak Guns + DBY-827 Heavy Turbolasers + Minister Tua + Reactive Gunnery
If you're otherwise not terribly concerned about what you're doing with your weapon team slot, Local Fire Control can turn your "meh" contain into an "oh, neat" salvo token, opening up options for the ISD-I chassis to do something beyond just "attack well at close range." Minister Tua and Reactive Gunnery give you effectively a second salvo. With Flak guns you'll be throwing a salvo back with one red and two blue dice out to long range and with the DBYs guaranteeing a crit on one of your dice to fix a blank red die or when you have an accuracy you don't want. This build has some definite similarities to the Back Atcha Buddy Interdictor build - the Interdictor is a more cost-effective salvo boat here but the ISD-I comes with much combat potential outside of salvo at a higher cost. So it's your call, really.
For my money, this is probably the most palatable salvo build for an ISD. The ISD-II and Cymoon want Gunnery Team more and the Kuat generally wants boarding teams more and has a shorter-ranged rear arc (red+blue+black) that won't reliably hit 3 total dice and can't take advantage of DBYs.

Compared to the ISD-I, the Kuat is more focused on brawling to the exclusion of just about everything else (Squadrons 2?). To that end, it has some advantages there:
- An ordnance slot, which can make its close-ranged attacks particularly destructive.
- A defensive retrofit slot, which is particularly welcome on a ship that needs to get in close to do its job.
- A minimum of one blue die and one black die in each arc. This allows for anti-ship attacks from each arc to use die-specific effects (notably Leading Shots) and/or potentially trigger blue or black critical effects, especially when stacked with a reroll or used with Screed.
- This is an advantage when it comes to being a close-ranged brawler, but it comes with the downside of being almost comically ineffective at longer ranges in the side and rear arcs. ISD-Is aren't amazing in this regard, but they're better than a Kuat.
- You can use Point Defense Ion Cannons here for much the same reasons as you'd consider them on an ISD-I, but Leading Shots is more appealing when you can use them for dice rerolls on every arc and you'd like to commit your weapon team and offensive retrofit slot to a boarding team.
Builds
Bunker Buster
Assault Concussion Missiles + Ordnance Experts + Leading Shots
Your goal here is very simple - get your prey double-arced and unload your front and side arc at it, pouring in lots of damage. Between the Leading Shots and Ordnance upgrades, all of your dice can get a reroll followed by your black dice getting another reroll. With all of that working in your favor, you've got slightly higher odds of producing an accuracy result in the front arc and your black dice are very reliable at triggering the Assault Concussion Missiles out of your front or side arcs. The upside here is that even if your attacks are braced down, your ACMs are adding 2 extra unbraceable damage and you'll be gobbling up shields at a very rapid pace. Combine this with a Heavy Ion Emplacements helper ship and you'll be crushing even heavy targets in no time flat.
The main downside of this kind of build is it's more specialized against medium and large ships and assumes your targets will be redirecting. Against smaller ships (especially those without redirects), it's generally overkill and you run the risk of flubbing your attack rolls against flotillas.
Devastator Dice Hose
Devastator + Electronic Countermeasures + Expanded Launchers or External Racks
What if I told you it was possible for a ship to throw 15 dice in one attack without using Most Wanted or Opening Salvo? That scenario is implausible but not impossible with this build. Devastator is a good fit on an ISD like the Kuat that has access to a defensive retrofit slot inherently and is prone to getting some defense tokens shot out from under it during the course of regular use. Might as well turn them into extra dice, right?
 |
| "Ackbar gets to drink from the fire hose!" |
There are a few upgrade options to round out this build that will depend a lot on the rest of your fleet. If you're using Screed or Vader as your commander, I'd consider Heavy Ion Emplacements as your ion cannon upgrade to pour more damage into the target. Otherwise, Id' recommend Leading Shots in the ion cannon slot and your call between Ordnance Experts and a boarding team (I'd recommend Boarding Troopers or Vader, myself) unless you have a very good reason not to for rerolls. For your mountain of dice to do serious damage to the target, the brace absolutely needs to be dealt with and if you're not using Leading Shots or Vader to reroll the blue dice and/or fear Electronic Countermeasures, then I'd consider using an Intel Officer for your officer and/or having Captain Jonus around for the guaranteed accuracy.
Boarding Party Kuat
Darth Vader boarding team + your choice of ordnance upgrade + Leading Shots
This is similar to the ISD-I variant only you can't guarantee accuracy results with H9s but you can pour in an awful lot of damage. Finding some means of dealing with brace and scatter results will help significantly.
For ordnance upgrades, any of the standard anti-ship options are pretty good. Expanded Launchers bears a special mention as if you can lock down the brace (with rerolls or help from other sources) you can do a stupendous amount of damage with a base of 10 dice coming out of the front arc. Otherwise, External Racks, Assault Proton Torpedoes, or Assault Concussion Missiles are all swell.
Boarding teams
Before we move on to the artillery ISDs, I want to touch on boarding teams when it comes to the Kuat. In short, while I'm generally okay with using Ordnance Experts and Leading Shots together by default, a single source of rerolls (usually that's Leading Shots) is often sufficient to allow you to devote your weapon team and offensive retrofit slot to a boarding team if you would like to. It's a good match: both the Kuat and boarding teams want to be at close range, the Kuat doesn't mind giving up its offensive retrofit and weapon team slot, and the Kuat can hang on to a squadron token pretty painlessly. The question becomes "which boarding team to use, exactly?"
 |
| It's a boarding party and I brought the angry cyborg space wizard |
The answer is "basically any of them, provided you build for it," although there are some that have more obvious uses than others. Boarding Troopers produce an effect similar to a turbocharged double Intel Officer - the defender can certainly use those tokens if you don't get an accuracy, but they'll be gone for good if they do, and the effect applies to both of your attacks and any subsequent attacks from other sources that round. The Darth Vader boarding team is a bit more meta-dependent, but is a great way to remove pesky Electronic Countermeasures or Lando or other such defensive upgrades from defending ships right before you drop the hammer. Boarding Engineers gets an honorable mention - they're not really my preference but if you expect to get enough facedown cards to stick you can really cripple a ship flipping 4 cards faceup as you fire off a parting shot and leave.
One final thing I'll add is your choice of defensive retrofit is largely dependent on your meta and your fleet build, but in general I recommend filling that slot unless you have very compelling reasons not to. The Kuat is going to be the center of attention and it needs to commit itself to a decent level of danger to do its job and a defensive retrofit helps keep it alive.
 |
| *Red and blue dice gathering intensifies* |
Similar to my pairing of brawler ISDs, our remaining two candidates are paired together as "artillery ISDs" due to their preference for medium and long-ranged combat. If you've decided you want an artillery piece instead of a knife-fighter, you'll turn to one of these two. Although artillery ISDs lack the damage potential of brawler ISDs (they're still no slouches, mind you), they're easier to get on target due to a suite of dice with much more generous range that can still threaten smaller ships with destruction with only one or two serious attacks. Heavier targets require more work, but having some help from specialized upgrades and/or other damage-dealers will make the task easier.
Artillery ISDs are frequently equipped with Gunnery Teams to allow their front arcs to (at least threaten to) contribute as many dice as possible and diminish cases where a secondary target can "hide" behind a higher-priority target in a given arc. Given the expense of artillery ISDs, your generally want to get as many dice out of them as you can and you especially want to have some means of leveling the playing field against MSU as quickly as possible, given it can take more than one attack to drop small ships, especially at long range where their evades work at full strength.
Basic tips and tricks
Artillery ISDs are often angling to get their front arcs covering as much table space as possible to keep their options open for flinging lots of dice with Gunnery Team, but if they're up against heavier targets they can and should still try to apply their front+side arc to the same enemy ship, just like a brawler ISD (although with less explosive results overall). Speed control remains important - generally artillery ISDs will prefer to go a bit slower than their brawler siblings to try to keep targets in their front arc for as long as possible, but jetting up to speed 3 to threaten enemies who thought they were safe can be very satisfying; you'll just need to prepare for cranking the speed back down so you don't accidentally overshoot them in the future.
As I mentioned already, their damage output is good but you won't be able to produce burst damage like the brawler ISDs can. You will usually need friends to help you bring down sturdier targets; it might be worth ignoring them, focusing your attacks on softer enemies, and flying past them if you won't be able to solo them by yourself.

Compared to the new hotness Cymoon, the old-fashioned ISD-II still has some advantages:
- A defensive retrofit slot, which when combined with a tendency to be used more cautiously, can keep the ISD pretty safe.
- An ion cannon slot, which can make a huge difference in dice reliability with Leading Shots.
- Point Defense Ion Cannons can be considered here with enough other dice fixing, or perhaps a blue crit ion upgrade as well, but for most builds I have a hard time giving up the flexible dice correction of Leading Shots.
- 8 total dice in the front arc compared to 7.
- Squadrons 4, which is a bit more helpful than Squadrons 3 when it comes to incidental squadron-pushing or when used as a flagship for a squadron-heavy fleet.
- The side arcs are better at long range, but otherwise the two side arcs are fairly equivalent at medium range.
- Two blue flak dice combine more favorably with Gunnery Team for hosing down a lot of squadrons, combine well with upgrades that are commonly seen on the ISD-II (like Leading Shots and H9 Turbolasers), and are useful against scatter aces.
Otherwise, a native defensive retrofit removes the pressure to use Minister Tua in favor of the usual cast of characters vying for the officer's chair. That defensive retrofit slot also makes the ISD-II a welcome choice for flagship, provided you're comfortable with putting so many eggs into one fairly robust basket.
Old Country Buffet
Gunnery Team + Leading Shots + buffet options include:
Turbolasers:
- XI7 Turbolasers if you're confident of getting an accuracy and/or are using an Intel Officer to eliminate brace tokens and plan on going after heavier prey.
- H9 Turbolasers if you'd like to guarantee an accuracy and would like to threaten flotillas and the like from long range. They also make your flak nearly guaranteed to deal 1 damage to scatter aces (by flipping a crit or hit to an accuracy if you need one), which can add up.
- Quad Battery Turrets if you're planning on keeping your ISD-II going relatively slow and would like to be able to use Leading Shots on long-ranged attacks by adding a blue die. Also helps make your side arcs scarier against small ships trying to run past you.
- Spinal Armament if you just want to focus on your front arc producing as many dice as possible without relying on tricks.
- Heavy Fire Zone is worth considering if you weren't planning to do anything else with your turbolaser slot and/or flakking is a big priority for the ISD-II in your fleet. Turning your two blue dice into two red dice against squadrons (if you choose to) can give you some extra long-ranged flak opportunities against enemy squads and pairs well with Agent Kallus if you are willing to give him your officer chair.
- Linked Turbolaser Towers is always a flexible choice in that it helps your red dice reliability (especially in the side arcs where you may not want to give up a blue die to reroll with Leading Shots) and can boost your flak against one particular squad but I find generally it's not doing a lot of heavy lifting with the ISD-II.
- Electronic Countermeasures if you're teching against other large ships. Usually paired with XI7 Turbolasers (see above) for that reason.
- Early Warning System if you're teching against squads and swarms.
- Advanced Projectors if you want to keep it cheap and get use from all your shields.
- Don't combine this with Expert Shield Tech but do consider this with Reeva Demesne.
- Reactive Gunnery if you like getting in some extra kicks with salvo.
And then add an officer and title to taste and you're basically done! This basic buffet ISD-II has been a staple in fleets since wave 2 in some form or another and is a very versatile (if expensive) build. That said, with Armada 1.5 requiring a concentrate fire command to use Gunnery Team and a repair token to ready Electronic Countermeasures (which is generally what I'd consider the default upgrade here, at least in 1.0), I would strongly recommend a token-producing officer like Vanto or Wulff to keep your maintenance needs handled.
If you don't want the fairly rote buffet ISD-II, might I interest you in some weird builds?
Flak Friend
Agent Kallus + Heavy Fire Zone + Leading Shots + Ruthless Strategists
This ISD-II is built to support a heavier squadron group, particularly something with a lot of hull like TIE Bombers. That said, you can still throw a good number of dice at ships and if you want to build with Gunnery Team instead of Ruthless Strategists, you can do that too as a hybrid option. Regardless, the basics of this build are you get to convert your two blue flak into two red to throw flak at long range if you need to. If not and you're at medium or close range, you can use Ruthless Strategists to help you melt squads faster. Either way, Agent Kallus is there to help. Don't neglect to have him add a blue die at long range if neither red die was to your liking so you can reroll them both with Leading Shots!
Salvo Triangle
Emperor Palpatine + Local Fire Control + DBY-827 Heavy Turbolasers + Reactive Gunnery + Flak Guns
Okay, so you're giving up the tried and true buffet-style ISD-II and you're getting... this. Now what the Salvo Triangle has going for it is a bag of weird tricks. In short: when an opposing ship attacks you, Emperor Palpatine makes them spend a defense token. You salvo back, either with Reactive Gunnery or your regular salvo token. Once their attack is concluded, you salvo-attack back with 2 blue and a red die that all fire out to long range. DBY-827s let you set a disobedient die face to a crit.
The goal is to double-arc some poor ship and hit it for 12 (8+4) dice. Then when it attacks back, salvo it for 3 more, for a total of 15 dice. This is similar to the ISD-I salvo build in many ways - I feel like it gives up a bit more compared to a "standard" ISD-II build to be a salvo boat, but being able to get Emperor Palpatine in the officer chair can make it extra annoying, so your mileage may vary.

The Cymoon has some advantages of its own over the ISD-II:
- 8 points cheaper. Points is points, and 8 of them is enough of a savings to afford a pretty nice upgrade.
- A second turbolaser slot, which can be very nice but only matters if you're intending to use both of them.
- A fleet command slot. The Cymoon is the only ISD with a natural fleet command slot that doesn't need to use the Chimaera title to cheat one in.
- In general, if you're not using Intensify Firepower! in this slot, you better have a very good reason, though, which I'll touch on shortly.
- 5 red dice in the front arc makes the Cymoon the red-dice-heaviest ship in the game at the moment (not considering add-ons like Ackbar and the like).
- 2 black flak dice do superior average damage against squadrons compared to 2 blue flak dice (1.5 versus 1.0), which can help against generic squadrons that get too close, although the shorter range and inability to generate accuracy icons present some difficulties.
One final note about Intensify Firepower!: it's a pretty swell upgrade, especially for the Cymoon, but you need some kind of support system to feed it tokens to get use from it more than maybe twice. That support system (usually a Comms Net Gozanti or a token officer) costs points, so consider that when planning out your fleet.
Director Krennic is a somewhat-appealing officer for the Cymoon, giving it access to the red die rerolls it wants but generally (without Vader) can't have. The main issue is the opportunity cost of giving him the seat compared to another officer and finding ways to get con fire commands in on his ISD. The easy way is con fire tokens (passed by a friendly Comms Net Gozanti), which give you a total of 3 dice rerolled, which is usually plenty. Your Cymoon is going to want access to con fire tokens or dials anyways due to Gunnery Team, so it's not a huge giver-up. Dials are obviously better, of course, but it's tough giving up navigate or repair dials when you need them, so tokens are usually easier to source.
Builds
Turbolaser Build-a-Bear
Gunnery Team + Intensify Firepower! + build your own turbolasers
Similar to the Old Country Buffet ISD-II, you've got a lot of options for turbolaser pairings here, the main limitation being that many of them are Modification upgrades:
- Spinal Armament + Linked Turbolaser Towers: This is what I'd consider the default pairing for the Cymoon if you go for both turbolasers and it offers an attractive extra red die (6 red dice front arc!) with a one-die reroll on your red dice combined with Intensify Firepower to flip one other blank to a hit. It's not perfect dice control, but having control over 2 of your dice isn't bad and the LTTs can help with flak against a troublesome scatter ace too.
- H9 Turbolasers + XI7 Turbolasers: This build is pretty straightforward: find the brace, lock it down, pump damage into the ship with XI7 Turbolasers debuffing redirect.
- Turbolaser Reroute Circuits + Spinal Armament + Captain Needa: This is a bit of a weird build no doubt, but between Turbolaser Reroute Circuits and Intensify Firepower! this is the best non-Vader method you've got for dice control, allowing you to flip one die to a hit and one to a double-hit or crit.
- If you're planning on slow-rolling, Quad Battery Turrets can always substitute for Spinal Armament if desired.
Is it just me or is the Kuat Refit the Tector-class in all but name?
ReplyDeleteA build I'd consider worth mentioning for the ISD2:
ReplyDeleteVader + Intel Officer + Gunnery Team + ECM/EWS + HIE + QBT + Devastator
Lifted from Green Knight's HIE Article on his blog, I've been enjoying playing around with this build. It's crazy expensive at 201 points total, but when slow-rolling at Speed 1 it can pretty consistently put out 4 reds and 2 blues at long range (by Intelling your Contain on the first shot) and then follow up with rerollable 10+ dice barrages if/when the enemy survives closing to medium.
Chimaera and Cymoons have another contender for the officer slot: Wullf Yularen. As fleet commands say to spend a token, not discard, he can replenish it, allowing you to use other commands. It also makes it easier to cue up tokens for other fleet commands, if using Chimaera. This also frees up the Comms Net Gozanti that was following along solely to feed that command, and makes the Star Destroyer more self-sufficient.
ReplyDeleteThe catch is that you can't use Strategic Adviser without running a double ISD fleet, so bring lots of cheap ships (Arquitens, Raiders, Gozantis, a Quasar, maybe a Gladiator) and pick squads accordingly. If you decide to go full command power and bring Chimaera AND a Cymoon, there are some questions to ask:
- How often you intend to use each ship's command(s)? Every turn? Wullf. Occasionally? StratAdv.
- How risky it is? StratAdv will last slightly longer on a Cymoon than a Kuat. ISD2, however...
- Does my Commander help me with extra tokens (Tarkin, Thrawn) or effects (Vader, Screed)?
and most importantly:
- Why the heck am I dropping 250-300 points on two ISDs?
For those wondering why Wullf is better than Grint, it's because Grint also demands setting your dial to the same command every turn, which is what you're trying to avoid doing. Plus, should you decide to run a medium ship or ace squadrons instead of 2-3 smalls/generics for the same price, Grint works better than Wullf on the InterDoctor or the Squad 6 Quasar, which love using the same command.
From a lore perspective, it's rather fitting Wullf synergizes with Chimaera, Thrawn's flagship. When Thrawn was first ascending the ladder of the Imperial hierarchy, Yularen recognized his brilliance and helped him make connections with other high-ranking officials. The two continued to work together up to the Liberation of Lothal, after which Thrawn vanished, and Yularen was later sent to the finished Death Star.
I felt that fleet commands would make Wulff more appealing on ISDs when wave 7 was (mostly) spoiled, but in terms of seeing him used in competitive fleets for that purpose, he largely hasn't shown up because Strategic Adviser/Pryce/Brunson/Tua/Intel Officer are all fighting for that chair as well and they usually win that fight.
DeleteThat said, I think Wulff is fine for more casual fleets and he's fun with Chimaera and Cymoons for the fleet command assistance.
I actually think Wulff is going to be pretty solid on Command SSDs (to power the fleet command[s], similar to what you said) and/or with Piett to keep using a specific token as a full strength dial throughout the game. Having 3 officer chairs on the SSD makes him a much easier inclusion in my opinion.
I had a feeling it would be more of a casual combo than a competitive one, especially in higher point games where double ISDs are more reasonable.
DeleteI agree that the command shenanigans are more likely to appear on the SSD, and I noticed some other things that are possible. I'll put those on the SSD entry, for consistency's sake.
Just a heads up on the bunker buster. I believe you missed a 1.5 update reference as ACMs can no longer drop 4 damage into a double arc.
ReplyDeleteThank you for your help, kind stranger, and good catch. It's been fixed.
DeleteCame across a bizarre but pretty interesting Kuat build the other day running Flak Guns, Reactive Gunnery, Ordinance Experts, Kallus, and Ordnance Pods. Wasn't quite as potent against ships as a more standard Kuat, but it absolutely ripped my fighters to shreds. Having my carrier blasted by the front arc with Ordinance Experts stabilizing the dice followed by three rerollable blacks out the side at every single squadron (with two extra dice for aces) really wasn't fun. One unlucky generic X-wing even died to a salvo, taking five damage in one turn. From flak.
ReplyDeleteNot entirely sure how I feel about it as the primary flagship in a 400pt fleet. It only loses six points of upgrade utility if it ends up against a squadronless fleet, but missing out on an ordinance upgrade and officer slot really sucks. I feel like it would be really interesting as bomber support, or to guard the flank of some other big ships in an 800 or 1200-point game.
It's super neat seeing the black-dice-flak element of Flak Guns getting some use, though.
Might I add that if you put SW-7's on your ISD-1 Salvo Boat, you can use the DBY's to ensure 3 damage salvos!!
ReplyDelete