
Welcome to the Separatist officers article! Let's talk about who gets to ride around in the robot space donuts, shall we?
 |
| Makes perfect sense. |

Twice the officer, double the Raid shenanigans!
Asajj Ventress took an FAQ or so to get her understood, and a change as well, and she's..... present! Let me lay out how and why you want to take and use her:
- Your opponent has a raid token on their ship.
- Assaj lets you remove the con fire raid ("discard 1 raid token")
- Your Patriot Fist gets the con-fire token it needed to reroll another dice this turn.
 |
| "Yeah, just bring me an extra from Willow. Or maybe Dark Crystal? Look, just some Jim Henson-lookin' dude in a costume, okay?" |
Passel Argente
seems complex, but actually he's not: you put a command token on his
card after you reveal your command dial so you can keep track of which
commands his ship has revealed so far that game. Once you've caught all
four command token Pokemon, you get an extra command dial of your choice
from that point forward, right after you reveal your command
dial. It should be noted that this is only for the commands revealed on
his ship, not from resolving commands or receiving command tokens or
revealing command dials on a commander like Trench. Just his ship. That's it.
Let's get straight to it: Pastel Anime should be completely powered up by round 4, giving you free command dials for the latter half of the game. That means that Personal Agamemnon's ship should be planning to slot in a command for each different command type on rounds 1-4, which will then trigger his effect on round 4. This can create a bit of a logjam for some ships if you aren't careful - ideally you want Puzzle Assessor's ship to actually get value from each of the four different commands it will be revealing, whether as a dial immediately or as a token eventually (if you choose to keep it as a token instead of using it as a dial). You also want to get maximum value from the free dials you get later. This usually means Pasta Argentina is best on large ships, preferably with some kind of command token backup (usually from a fleet support upgrade on a Hardcell) to help smooth out the early rounds.
Like most effects that give "free" command dials, Pizzazz Anansi is usually (but not always) best off giving free squadron dials for maximum impact. The trouble is ensuring that his ship, which is presumably set up to command squadrons, is actually contributing earlier in the game while still setting up the catch-4 game to get those free squadron dials rounds 4-6 (assuming you need squadrons all those turns, but you get the idea). It's probably best to set this up with a squadron dial on round 3, and the other three commands interspersed on rounds 1,2, and 4 (don't forget, you get a free squad dial round 4 once you've assembled Voltron). You'll need to take your time getting to the fight to ensure you're not regretting a non-squadron dial on round 2, though.
The last thing I'll say about Passive Arguer is you need to be extremely careful against effects that change your command dials, like Slicer Tools. Those types of effects can upend your entire plan and cause a huge amount of trouble as they can stop Pickle Arugula from triggering for the entire game when used at the right moment. If you were counting on him from round 4 on and suddenly he just... doesn't, you spent points to inconvenience yourself and quite possibly lose the game.
Rune Haako is at the very least a double Veteran Captain for only 1 more point. The rules element is pretty straightforward: when you reveal a command, his ship can steal any number of command tokens (obviously you shouldn't take more than his ship can handle) from his card and/or as many command tokens as you want from any one other friendly ship at distance 1-5. He's good at producing and swiping tokens.
For only 4 points he's a solid inclusion on higher-Command ships, especially if that ship has upgrades that consume or require a lot of tokens to function. He also loves leeching off other ships that can produce tokens for themselves or stash them elsewhere (usually involving officer Tikkes and/or a resupply fleet support upgrade).
All that said, he can do great even on Command 1 ships provided you've got a plan for him and Tikkes isn't available or not a great fit. Token production can be absolutely clutch and even sticking to just his inherent two tokens for 4 points is a good deal.
 |
| "What in the San Hill does this card even do?" |
San Hill comes loaded with a bit more rules discussion than usual for a card you're unlikely to actually use:
- He starts with the 2 squadron tokens that you spend to power his effect. It doesn't matter that they're squadron tokens, as they don't interact with squadron commands in any way and there's no way to recharge them. It's just thematic because his effect has some bearing on squadrons and Armada doesn't have a generic "power token" for these kinds of things.
- He triggers at the start of the Squadron Phase. Even if you're player two, you need to make your decision on San Hill before your opponent starts activating squadrons during the Squadron Phase.
- When you activate squadrons during the Squadron Phase, for each token you discarded, you may activate one additional squadron at close-long range of San Hill's ship. In most cases, this will allow you to activate a total of 3 (1 token discarded) or 4 (2 tokens discarded) squadrons.
- The "regular" 2 squadrons you activate can be at any range of San Hill. The bonus activated squadrons have to be at close-long of him.
- The activated squadrons are still Squadron Phase consolation prize activations of either moving or shooting. They don't otherwise do anything special or get any other benefit, like triggering AI.
- If you replace your normal Squadron Phase activation using Hyperwave Signal Boost, resolve the HSB activated squadrons as usual (i.e. they benefit from AI) and then move on to the San Hill activated squadrons, who activate using his rules (i.e. they do not benefit from AI). In this way you can hypothetically activate up to 6 squadrons in a single Squadron Phase "turn" (4 from a ship with HSB, 2 from San Hill after that).
San Hill is designed along similar lines to Hyperwave Signal Boost: he's there to help you in the Squadron Phase when you can't activate a big pile of generic droid fighters in the Ship Phase through regular ol' squadron commands. His problem, unlike Hyperwave Signal Boost, is he doesn't trigger AI. So it's just as bad as waiting until the Squadron Phase like usual, only you get more of them up front (in best-case scenarios before they might otherwise be destroyed). If Squadron-Phase activating more squadrons than usual at a time might make a difference all on its own, he's worth considering. In most gameplay cases, most of the serious work happens in the Ship Phase and the Squadron Phase leftovers are a small consolation prize where not many will need to be activated anyways. Because they're not relying on AI, Belbullab-22 Starfighters are your best Squadron Phase activations but they're not really designed to be spammed where you'd have piles of them to activate with San Hill regardless.
If and when Separatists get Rogue squadrons,
San Hill could become much better. At the moment, he's basically binder
fodder. If you're making a fleet that wants piles of generics but
doesn't want to command most of them, use Hyperwave Signal Boost
instead.
 |
| Me trying to read a text-heavy meme a friend just sent me on my cell phone. |
Shu Mai is the opposite of San Hill: a pretty good card that doesn't require a ton of rules discussion. Just remember to choose the two round numbers after fleets are deployed, those two round tokens can't be consecutive, and when it's time to go out for dumplings, you get to reroll up to any 3 dice you like while attacking a ship, which includes salvo attacks (she doesn't help against squadrons). Oh also, I don't know why she's named after Chinese dumplings. They're delicious, but it's a weird name.
Obviously you'll want Shu Mai on a ship rolling a lot of dice. At least 3, probably more, and especially those with more red and/or black dice, as they enjoy the rerolls the most. Red dice in particular are easiest to reliably get use from due to the long range, but she's happy with anything, basically. She'll also want to be on ships making multiple attacks if possible, which isn't a big ask for Separatists, who are double-arcing: the faction. This makes her a large ship officer for the most part (although the odd Munificent doesn't mind a little help if you've got the spare points). Under usual circumstances, I'd recommend rounds 3 and 5 for her, but if you're speedy and aggressive, 2 and 4 can work just fine too. It'll depend on how well you can read the board and estimate when big fights will happen.
There's not much else to say about her, really: she's great on an aggressive large ship. Just try to get the timing right and have a blast. |
| "The evil pose programming comes standard." |
The T-Series Tactical Droid is like a tiny more limited version of the Imperials' Admiral Piett. The usual rules caveats bulletpoints being...
- Tacky the Droid only works on non-concentrate fire tokens. Sorry, concentrate fire.
- You have to be spending that token to resolve a command.
- You then resolve that command at dial strength instead of token strength.
- Although Tacky doesn't like helping with concentrate fire, he'll happily eat tokens of any type to refresh.
- This is the only way he's refreshing, mind you.
There's not a whole bunch to say about Tacky: he's a pretty solid generic officer that only the Separatists can take. Buffing the effectiveness of any of those commands can be very good but it's especially so with squadron commands, given it takes them from 1 squadron to X squadrons commanded. This makes Tacky a tempting option for ships that want to command squadrons at full strength, at least every now and then. The more token support your fleet can generate, the more use you'll get out of him. That said, even just using Tacky one time and letting him sit there exhausted afterwards still compares very favorably to the 3-point one-time-token-generating Veteran Captain and once you get multiple uses out of him he's pretty competitive against the 7-point Galactic Civil War faction-locked token generating/retaining unique officers.
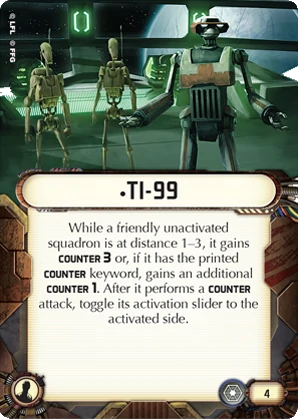 |
| "I got 99 problems but squads ain't one." |
Given Tri-Fighters already have Counter 2, his ability is best used on other squadrons, usually Vulture Fighters or in some cases Hyena Bombers. You generally want your Hyenas not getting shot but if they are going to be shot and stuck in a dogfight, I'd much prefer them attacking back immediately with Counter 3 than eventually with their native 2 blue (or never, if they get killed off before they can activate).
Given Vultures attack with 3 total dice and Swarm when they're commanded normally, TI-99 lets them "safely" sit around until later in the Ship Phase or even in the Squadron Phase if you're running more squads than you can usually command - if the enemy attacks them, the Vultures get Counter for as many dice as they were going to roll anyways (albeit at slightly less average damage but greater chance of getting an accuracy against scatter aces) and still proc Swarm if able. When used this way it's best to initially command your Vultures into a furball and then orbit it with TI-99's ship, which will add flak and keep your Vultures attacking back, even without squad commands. Hyperwave Signal Boost can help against opponents who don't obligingly attack your Vultures prior to the Squadron Phase and should be considered a core part of the "I brought way too many droid squadrons" toolkit alongside TI-99.
 |
| In the dank wetness of Mon Cala, there is only blitzball. |
Tikkes (Tickles to his friends) is the Separatist's favorite token-spamming Quarren. Let's decipher the pamphlet of text that is his card: essentially, when you reveal your command dial, you have the option of using Tickles. If you do, you're locked in to setting exactly the same command for the next dial you assign but you get a free command token of your choice right away (the token for the ship can be whatever type of command token you want, the token on Tickles' card must match the dial you just revealed to remind you what you must set your next assigned dial as). I want to note that you must assign the token-designated command to every dial you set in the next Command Phase, so if you have a way of discarding extra dials you'll be stuck assigning more than one command dial and they all need to be set to Tickles' special command.
Ideally, you should be using Tickles every round of the game for 6 bonus command tokens for only 2 points. On a Command 1 ship (like the Hardcell) that means you are spamming the same command every single round and the only way to stop the Tickles Train is to not use him on round X so you can change commands on round X+1. That's honestly not so bad on a support Hardcell with Comms Net that wants to hand out tokens to buddies constantly regardless, but you really need to plan around what command you're fine with spamming all game. On Command 2+ ships, you can minimize the downside of Tickles by alternating commands. So on a Command 2 ship you could set:
- Navigate
- Repair
And then when you reveal your repair dial, you set Tickles to navigate and your stack for the next round will be:
- Repair
- Navigate
and the cycle continues itself, alternating between repair and navigate all game. You can do the same thing with a Command 3 ship but it requires a bit more planning ahead. Effectively, so long as you stay on the Tickles Train, you are setting your dials for the entire game on round 1: your commands for rounds 4 to 6 will be exactly the same as your command stack for rounds 1 to 3.There's nothing stopping you from getting off the Tickles Train in an emergency but ideally the bonus token you receive helps make up for any immediate problems from "well this isn't the best dial right now but I guess I'll make it work somehow."
All that said, bonus command tokens are great and have nearly limitless applications. The easy uses are for ships that want to spam the same command, like a carrier using squadron dials, but also wants the occasional navigate or repair token. Tickles is also great for providing a steady stream of tokens to feed fleet commands, easily power command-triggered upgrades like Gunnery Team, or to ready token-eating upgrades like Electronic Countermeasures.
Generally, I prefer keeping Tickles on a Command 2 or less ship where it's easier to see what's coming and stop the Tickles Train in an emergency while there's still time to slot in a command dial that will meaningfully affect the game. The pressure of "set your entire command stack on round 1" for a Command 3+ ship is a little intimidating and by the time you see an issue with continuing the Tickles Train it's usually too late to meaningfully hit the brakes before whatever the unforeseen circumstance is has slapped you around a bit. To get the easiest use from Tickles, I like combining him with a Comms Net Hardcell (as I mentioned earlier) for token spamming across the fleet with minimal hassle. You can get the main benefit from Tickles without the dial-assigning hassle on a Command 3+ ship by using Rune Haako on the high-Command ship and having him steal Tickles' tokens from the less-beefy Tickles ship.
 |
| Looking like Daft Punk had a head-on collision with a renaissance duke. |
Wat Tambor's rules need a little clarification:
- Obviously, he only triggers on a repair command. Doesn't matter if it's token, dial, or dial+token. Any of those.
- If you're mostly looking to mooch shields off others or move your own shields around, the token option is pretty appealing.
- You may spend 1-2 shields from either:
- His own ship, split across different hull zones.
- Another friendly ship at distance 1-5, any one hull zone.
- Reminder that distance for non-attacks is measured plastic to plastic and only attacks are measured cardboard to cardboard so you might have a buddy who's barely in range.
By turning shields into 2 repair points, the easiest thing to do with the points is simply turn them into more shields. So remove two shields from wherever, regenerate two shields wherever on Wat's ship plus whatever repair points you've got from the actual command resolution. Even this fairly basic trick can be very handy for effectively moving two of your own shields from one side to another for free: even a lowly Hardcell resolving a repair token command with Wat onboard can use his ability to move two of its shields around (by dropping two shields for 4 repair points then spending those 4 points to regenerate two shields elsewhere) and then use the remaining 2 repair points from the token to move a further two shields if it wanted, or to regenerate one shield. That's not to overlook using those points in other ways, usually to remove damage cards, but it will be highly context-dependent as to whether you should spend those repair points to do something other than regenerate shields.
There's also the question of who exactly should you mooch shields from? The answer for me is typically "whichever ship in range is in the least danger, and then from the hull zone that has the least pressure." Sometimes that's Wat's ship (from a hull zone or zones with no enemies in them), sometimes that's another friendly ship (typically from the rear or far side hull zone). If you're mooching from a friendly ship and that ship has nothing better to do, make sure to queue up a repair command for the helper ship as well to regenerate shields and keep yourself healthy.
Wat, being a defensive upgrade, loves being paired with other defensive tech to up the tankiness of his ship. Defensive retrofits are the easy choice but he has some particularly fun interactions with some support teams:
- Auxiliary Shields Team: Wat enables for very easy side shield overboosting when you need to bring them back up later in the game. Assuming you've got one side pointed away from the enemy, shields you put there earlier can easily be shunted back to the side that's under pressure.
- Engineering Team: still not exactly a great upgrade, but when you're spending a repair token for (2+1+4=) 7 repair points, that's something of an accomplishment in my book.
- Projection Experts: first off you use Wat to steal two shields from a nearby ship to generate 4 repair points. Then you spend 2 of those repair points to send two shield points back to that ship or to a different ship. The remaining engineering points from shield-stealing and the repair dial and/or token go towards fixing up your own shields.
- Moving shields from ship A to ship B is a pretty flexible way of allowing ships that are pretty safe to prolong the lives of ships that aren't without having to spam Projection Experts all over.
- Moving shields from ship A back to ship A effectively allows you to move shields on a friendly ship without having to actually activate ship A and use a repair command. It's pretty handy for rebuilding shields in a depleted threatened hull zone that your opponent is trying to wear down even if the threatened ship has already activated.
So, if I'm using Pancake Admirer - I mean, Passel Argente on a Providence, would he be better off on a Squadron-focused ship giving out other orders, or on another one giving out Squadron? It seems to me that, in the case of the former, I would want to Squadron on round 2 for the alpha strike, but doing so means I don't get a Squadron later. Is there a way around that?
ReplyDeleteThere is no way around it, which sucks. It's why I'd recommend slow rolling and trying to get the squadron fight started on round 3 so you can have squadron commands lined up for 3-6.
DeleteI'd also recommend having the carrier he's on doing other commands than squads (after the mandatory squads command) rather than dialing in squads for rounds 4-6. The reason for this is you never know exactly what your squad needs are going to be going into the future - maybe they get killed or get out of reach of your ship or whatnot. If things turn out great then Pasta Assistant can keep giving you squad dials. If not then you've got the flexibility to take a different command on top of your dialed in command.
Is it just me or does rune haako fail to activate if you are outside of distance 5 from all allied ships? It's an unlikely occurrence but seems like the kind of thing to be mindful of when relying on him.
ReplyDeleteThat is a weird interaction, but as written I believe you are correct.
DeleteGood to know I'm not seeing things. Interesting seems like it would rarely come up but still good to keep in mind for big-heavy lists where your Christmas tree Providence could wind up as the sole survivor or when a munificent planning on lobbing red dice falls behind the knife fighter resucants/slicers.
DeleteThoughts on Pastel Argente: feels really tailor made for an aux-shield-team munificent.
ReplyDeleteTurn 1: Crank shields up to 4/4-4/3
Turn 2: bank a navigate to save for speed adjustments
Turn 3: Squadron or firepower as needed
Turn 4: profit!
The aux-team answers the question "why am I queueing repair early game" and allows argente dials to keep shields overcharged if/when squadron commands become irrelevant