
The transport ship that launched the Clone Wars, the Acclamator is the GAR medium base, and it's going to be strongly prevalent throughout your lists for waves to come.
 |
| Begun, this article has |
 |
| I really appreciate FFG doing all the work and pictures for my articles for me |
So, we have an improved Victory in the "Clam" here (Clam because it's an acclamator not acclimator). Identical side dice and slightly different hull/shielding; less strong front dice but improved flak and speed chart IN A FASHION. Let's break those points down individually. I crib a lot of Eric's points from the Victory article here, so anything I'm quoting will be in his usual red font.
Breakdown:
- Maximum speed 3, which seems like a step up from the Victory, right? It would be if you could steer. The yaw click being on the first joint for speed 1 and 2 helps, but it's still a fat rhino. I LIKE it, but I like jank and challenges. The fact that you decided to push your bull towards a china shop doesn't make it do ballet. At speed 2, you're going to be outdanced by most other ships. You don't have much yaw, so I'd honestly view speed 3 as the "get out of trouble" speed rather than the "time for my approach vector!" one. I had several test games where I either flew it off the board or out of the fight because I thought speed 3 was what I wanted. Play around with the yaw a few times, see where you end up each time. Its yaw chart is NOT GREAT.
- The flip side to that is that BECAUSE the yaw is on the first joint, it's easy to keep your face pointed towards what you want, provided it doesn't sneak around to your sides. When they get there your dice get significantly worse than your face.
- Your nose is the strongest part of your ship, good thing that hull zone is the largest! Your 4 shields there are better than the 3 of a Victory, but with only a single redirect and 2 on the sides you're going to start taking hull damage much sooner than you'd prefer. The hull, shields, and dice you get for the points cost makes every other medium ship in the game jealous.
- Neither Acclamator has an Ion Slot. Which means you can't use Leading Shots to fix your dice, so it's likely LTT for the reds, Intensify Firepower! on your Venator, or accepting the roll you get no matter what happens. Or concentrate fire tokens to reroll single dice, which pairs well with Clone Gunners.
- No inherent defensive retrofit slot on the Acc1. So long as [it] gets to use its defense tokens, it's actually pretty durable. If it doesn't, it can be surprisingly vulnerable, especially given it's not fast enough to run away. Just like most expensive ships with a single brace, it's generally desperate for Electronic Countermeasures to go up against other heavier combat ships.
- The related point there is that the native Salvo acts as a deterrent to plink damage, and often may be what your opponent wants to lock down with any accuracies. Or they'll suffer the 1-2 dice attack and lock your brace. As mentioned earlier, though, defense token debuffs (particularly anything that hoses/locks down your brace) can cause problems.
- 3 Squadron and 4 Engineering are pretty standard for "heavy medium" ships and allows it to act as a decent second-tier carrier and to repair as well as most large ships.
Basic Usage Recommendations:
Deployment weights heavily on how useful an Acclamator is going to be before it even activates. Good deployment is important for every ship, but the worse a ship's speed and maneuverability, the more important deployment is because you have less capability to "fix" a deployment mistake. Given the Clam has a terrible nav chart, your deployment decisions with it are extremely important. Try to deploy the Clam as late as possible so you have the most information about where to put it and try to keep it towards the outside of the fight (so it's tough to gang up on or go around "the long way") but not too far to the outside (where it's easy to run away from). This is likely going to be easier in your first few games with the GAR as you'll most likely use the Clam as your flagship, which you'll want to deploy later anyways. You want to get use out of your Salvo, but you don't want to have to burn it in one turn either. That's the same as the other tokens.
Clams love friends. They do not do well unsupported because getting around them is generally easy to do and with their poor yaw they don't get a second chance to attack anything that slips past with their front arc. By operating near other ships, their flanks are guarded and slipping past them becomes much more dangerous. Flank guards don't need to be expensive - Chargers do just fine and can still do what they want to do while also making going around the Clam's side dangerous. Given the GAR emphasis on synergy and togetherness, this is even more true than the VSD. Your friends may be a heavy squadron ball, or a Charger coming up behind.
Navigate constantly unless you have something better to do. Remember those speed chart problems I mentioned earlier? Maneuverability in particular is a huge problem for Clams and by using navigate commands to increase your yaw (and change speed when necessary) you are doubling your yaw. The significance of doubling your yaw cannot be overstated and it helps the Clam keep its front arc on targets and to some extent avoid trouble. I encourage you to think of it this way: if you use a navigate command to keep a target in your front arc when you otherwise would not have been able to do so, you just used a better concentrate fire command - at full dice range, you get twice the dice from a front arc attack vs. a side arc attack and even at red dice range you get 1 more dice overall, the same as concentrate fire but much more likely to be in a situation where enemy attacks are directed at the front hull zone where you can redirect more effectively (to either of your 2 shield sides).
Consider speed 1. This isn't to say don't ever go speed 2 or 3, merely consider speed 1 at all times. Clams have a tendency to overshoot targets heading towards them when they go speed 3 because they simply can't reposition well enough with their limited yaw. Once the enemy is past them, it's nearly impossible to get the front arc on target again. When going speed 1 (particularly with the extra yaw from a nav dial), you get more time with enemies in your front arc. Again, for me, speed 3 is the "LOVELY PARTY THANKS FOR HAVING ME TIME TO GO" speed for when you're shieldless and down to about 2 hull. You do NOT steer at speed 3, but you might get to live. Accept the fact that you might not, too.
 |
| You can SEE how hard I'm cribbing Eric's Vic article here, so I added a picture for a break. |
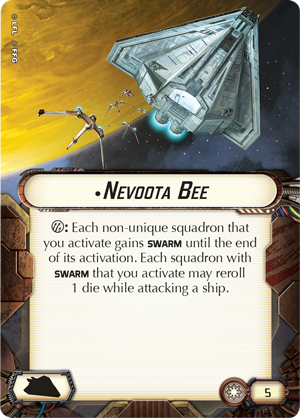
With Squadron 3, even your gunship Clams can pitch in for help with squadron commanding on a crucial round or two. Even though the Venator has showed up, these are still cheap, dependable carriers, and Nevoota Bee is on an Acclamator still.
Lead your targets. It's fairly common to see newer players direct their Clams directly at the ships they wish to attack next turn. The problem with this approach is that unless the Clam activates before the intended target, the target can usually zip out of the Clam's front arc before the Clam gets to shoot. For that reason, I encourage you to turn the Clam so that the target is on the edge of your front arc with its future movement path taking it into the remainder of your big front arc. This makes front arc attacks much easier to line up and makes your Clam attacks less order-of-activation dependent. This is overall good advice for any front arc attack ship, but for something less maneuverable like a Clam, it's more important still.
 |
| Definitely not me just faking a new version of Eric's picture, no! |
Titles:
Hey look it's John again not just duct-taping half of Eric's work into my article! There's two titles and they're both wonderful.
 |
| It's a miracle! Because females are strong as heck |
The Implacable goes on your gunship/bodyguard Clam, and acts as such. It can take 2 damage from anything up to distance 2 away (this includes itself, so the title can act as a fake redirect). Damage reduction effects and damage passing effects (waves in Biggs Darklighter and Gallant Haven) have been consistently helpful for the life of the game. Don't necessarily just do this to do this, but you can make a great bodyguard engine with this. I'm not saying "sacrifice the Implacable to keep Anakin alive" but I am potentially adding "if it gets you the table of your opponent" to the end of that phrase. This does stack with other damage reduction effects (braced damage, Kit Fisto's discard ability). You ARE going to end up wanting to engineer more often than you'd think, as this only works on front shields. One amusing trick with this is taking damage on your rear arc as you speed away and using the title as an unblockable redirect to move that damage to the front.
 |
| More like Nevoota BAE (thanks for that pun, duck!) |
The Nevoota Bee is your carrier title for your carriers to carrier with. You should do other commands with it of course, but you put this on your Acc1 carrier and you push squads. Any non-unique without swarm (Y-wings, Deltas, and ARCs) gets Swarm, and everything with Swarm (this includes Aces who already have it!) get to reroll a dice while attacking a ship. This ship swarm, or "shwarm" stacks with things like Adept and Bomber Command Center. Your damage gets incredibly steady with the ship. A V19 has (6/8+2/8*6/8) a 93.75% chance of doing a damage to a ship with this, a 37% improvement. A generic Delta with this and Adept has (4/8+4/8*(4/8+4/8*4/8)) 87.5% chance of dealing a damage, a 12% improvement from its normal 75% chance. Y-wings have that same 93.75% chance of doing A damage if you just use the title, but this allows you to chase hit+crits more aggressively if you also have Bomber Command Center for a second reroll (roll your initial dice; if it's not a hit+crit reroll it because you then have that 93.75% chance of a damage with the Bomber Command Center followup after the Swarm ability). I'll leave the ARC damage as an exercise to the reader (which is me saying I don't want to do the math). Even just giving Swarm to your ARCs and Deltas as they attack squads with their dice is brutal, just allowing for more and more dice correction. You don't have Toryn Farr, but you have the Bee. Sting them all.
 |
| It's my first triangle, guys! |
Acclamator 1:
The Acc-1, having 2 Offensive Retrofits, is much more of a carrier than its counterpart. It has the substantial benefit of being cheap for all its raw stats (hull, shields, dice) at 66 points but it's extremely important with Acc-Is to try to avoid loading them up with upgrades "just because." This is true of every ship to some extent or another, but particularly so with Acc-1s. Their starting cost is pretty cheap for what you get, but they can get expensive fast. Don't just add something to a slot just because you can, have a reason for including it.
I encourage you to think of the black dice as a deterrent (oh, so you want to get close, huh?) moreso than an active source of damage - the Clam's maneuverability problems make it pretty unreliable at delivering extensive black dice to targets more proactively. The red dice can unfortunately be unreliable, and unless you're using... some dice-fixing..... it can be difficult to count on them to deliver when you need them to. I wouldn't usually look at a black critical effect with them, as the dice just aren't numerous enough to count on one appearing.
The Acc-1 and its builds don't usually end up as anything flashy, but if you keep it cheap it can end up doing a lot of good work for you over the course of the game. Build it towards a carrier and use the Acc-1 dice as a "well that helped" aspect instead of an "I need this to roll well" one. That second one is the Acc-2.
Upgrades:
Officers:
Most "big ship" officers work for command 3, but to focus on some specifically good ones here below;
- Flight Commander if you're doubling down hard on the carrier aspect and can have Bail nearby to help you navigate and engineer as needed.
- Clone Navigation Officer to get tokens and pass tokens around
- Skilled First Officer just to ease in timing things if you only have the point; it's not a bad option
- Adi Gallia allows for a fake other redirect, which can be very helpful as you're a little squishier than you appear.
Or just leave it blank! I can understand that decision as well!
Weapons Team:
Flight Controllers. Lean into the carrier aspect of your ship and give the squadrons you're commanding a way to improve their anti-squadron damage so they can then win you the game. You can make a case for a boarding team, I suppose, but I can't make great claims for it considering you steer like a hippopotamus. Still, might be worth a look as you approach slash as a deterrent if you take more than 1 of them? Ordnance Experts is an upgrade you can use, but I worry about both the lack of black dice and the inability to steer properly to use them.
Offensive Retrofit:
Hyperspace Rings is nice and cheap and helps any ARCs you're planning on bringing, while Expanded Hangar Bays and Boosted Comms are always nice to have on carriers. Depending on the number of V19s you bring (and if you have Nevoota Bee in your list), Reserve Hangar Decks is a nice solid choice as well. Advanced Transponder Net can also get some work done AND protect you and any nearby friends; just need to bring enough Y-wings for it to work. None of these are flashy upgrades, but they are all helpful ones. You can also make a solid case for Proximity Mines, especially given how cheap Acclamators are to bring. Flak Guns are a very solid, cheap choice here, allowing your red/black flak to reach out to medium range and do some mean things. Combine it with DBY-827 Turbolasers for a mean return fire (and a reason they'll definitely want to lock your salvo first!). IF you can get over the fact that your commander is riding on a defensive retrofit-less ship, Flag Bridge is a solid inclusion here as well. Just don't die.
Ordnance:
Weirdly enough, Ordnance Pods. External Racks is an obvious and easy choice here, but Eric and I had weird success running the Ord Porgs and just mulching any squadron that tried to get into close range of us. 2 black followed by 1 more black can REALLY hurt some squadrons on the approach.
Turbolaser:
Linked Turbolaser Towers, but leaving it blank is also acceptable here. I usually end up trying to keep the Clam-1 as cheap as I possibly can, just to allow for points being used elsewhere. If you put Flak Guns on, put DBY-827 on. If you put DBY-827 on the clam, add Flak Guns.
Builds:
Basic Bee:
Nevoota Bee (5)
Flight Commander (3)
Ordnance Pods (3)
83 points for this ship is a nice investment for a very chunky carrier. You'll likely want this ship moving in fast and flakking through your opponent's squads, which is why Flight Commander is on here. It allows you to flak first and second, then send in any squadrons to finish off whatever is left. I left the offensive retrofits empty, but I can add in something if necessary.
Battle Bus (79 points):
External Racks (4)
Flak Guns (3)
DBY-827 Turbolasers (3)
This is a 79 point ship. Every other version of the Acclamator-1 I could suggest to you is a variant of the Basic Bee. Adding in Hyperspace Rings or Reserve Hangar Decks or swapping External Racks for Ordnance Pods on it will give you a different game, but that really isn't worth writing about substantially. This is the only way of getting a boarding team into the GAR army, and at that point I'm trying a crazy idea and might as well just keep it incredibly cheap. You want to nav forward, deliver your Boarding Troopers, and dump all the dice you can on your opponent's ships. If you wanted to go nuts with it, you could add in the Bee title, Rapid Launch Bays, and Flight Commander to dump 3 ARCs out when you roll up on your opponent. I generally wouldn't do that. This ship exists to slam into something, board it and throw a bunch of dice, and if you're very lucky, it gets to leave afterwards.
 |
| Acclamator in the skyyyyy, I can fly twice as hiiiiiiiigh |
Acclamator 2:
For the low cost of 5 points, we improve a few things. An extra blue dice in the face, and swapping a back black for a blue! A defensive retrofit! Blue-black flak for longer reach! The.... Bombard keyword! It's a very similar ship. But the defensive retrofit allows you to wander a little closer into danger, and allows for a little bit weirder choices in upgrades than the Acc-1.
Upgrades:
Officers:
The same ones as before, though you can make a case for Intel Officer here as you have that additional blue dice to add in.
Weapons Team:
Gunnery Team, if combined with a turbolaser that adds in dice (see that section) isn't a terrible idea here. I can also see the merit of Ordnance Experts to reroll any black dice you end up throwing at your targets, as the defensive retrofit allows you to get in there a bit more and try to take a few more knocks. Clone Gunners is (in my opinion) better here than on the Acc-1, but it's really a matter of if you want to lock down their tokens or one of the other options.
Defensive Retrofit:
Likely Electronic Countermeasures, but we're already getting towards a token heavy ship that doesn't have a lot of ways in faction of getting said tokens. If you slowroll, you can make a solid case for Early Warning System, and Reinforced Blast Doors is good too. I wouldn't Reactive Gunnery, as you already have a Salvo and would rather stay alive.
Ordnance:
External Racks. Or, if you're adding in Swivels, pick a black critical effect of APT or ACM.
Turbolasers:
I'd recommend either Swivel Mount Batteries if you're going to use them or Spinal Turbolasers. They're both modifications, but they both increase the dice you can throw. Spinals wants to pair Gunnery Team with it for 4 red dice twice, and Swivels wants Ordnance Experts to make sure the black dice you're throwing are giving you the best chance at a hit-crit. Otherwise, Linked Turbolaser Towers is a solid dice fixer for your all-around needs.
Builds:
Sato Special crit build (99 points)
Acc-2
Ordnance Experts (4)
This build is built to get long range crits going into your opponent, con firing and potentially using the CNO to get dial+token for more rerolls as needed. You want to pick a large ship and trade up on it, throwing 3 red and (after concentrating fire) 2 black. That's very solid at long range, and the more you trigger ACMs the happier you'll be. ECM is on there for when you inevitably get run up on and you need to spend a token or two to stay alive. This is one of the few times where I WOULD concentrate fire with the ship for a chance at 2 black dice at range (with Swivels).
Artillery Acclamator (102 points)
Acc-2
Gunnery Team (7)
External Racks (4)
This ship is not cheap. However, you're also throwing 4 red dice at 2 different ships each time you con-fire; potentially 5 at your first one. CNO again is there for potential dial and token to help your dice steady themselves. I put Gunnery Team on the one with more long range firepower just to get a better chance of reaching out at 2 different targets, while the one that's focusing on crits wants to ensure it's able to reroll the dice to get them.
Generally Good (95 points)
Nothing flashy about this build, but it's also a decent workhorse. It won't do 4 and the ACM crit damage from range, but it also won't roll zero damage either. It's a relatively cheap chunk of ship that will also benefit your other ships in the fleet, and it's not hard to bring 2-3 of these if you just want a taste of the GAR.
 |
| They really like clouds, huh? |
Final Thoughts
The Acclamator is a ship that seems very well designed. It has its limitations, but it also has things it excels at. I expect to be using it with my Clones for a very long while.
"LOVELY PARTY THANKS FOR HAVING ME TIME TO GO" I love this quote. Great Write up. What are your preliminary thoughts on the Venator?
ReplyDeleteGenerally, for it, haha! I feel as it's such an iconic ship, it'll end up the centerpiece of a lot of my fleets, much like an ISD does for the Imperials. You can build fleets without it, but it and the Pelta are both very solid and good for what they offer.
DeleteJust to clarify, since it's implies by the post but not outright stated: both of the Nevoota Bee's effects stack, correct? As in, it effectively gives every squadron a reroll, since any squadrons without swarm that it activates gain swarm? I feel like that's a weird way of wording it on the card, so I wanted to be sure.
ReplyDeleteYeah it gives every generic it activated swarm and every generic it activates gets swarm against a ship.
DeleteRules question. Does nevoota bee make any generic eligible for reserve hangar deck if it dies during its own activation due to counter or a similar effect? Or is there something in the rules that says the activation is ended prior to dieing?
ReplyDeleteYep, it works. Generally it only works if you're attacking something with Counter and die, but it works. Your opponent can refuse to make a Counter attack if they wish to prevent this, I suppose.
DeleteInteresting it's good to know for the one in a hundred games where reviving a y wing or an arc 170 to get them unstuck from a blob of interceptors could be important.
DeleteIs it worth noting that Bariss synergizes particularly well with the Implacable title as she can save your front arc from taking damage too early or guarantee that you can redirect 2 damage to your front with the title?
ReplyDeleteits helpful for sure; though i'm not sure it synergizes unless you take 2 on the front and 2 more on the side for sure
DeleteIs it worth using flight controllers + nevoota-Bee to turn GAR-Y-wings into pseudo vulture droids? Or are you better off just buffing fighters that already do decent dogfight damage?
ReplyDeleteI'm trying to figure out if it's worth taking more bombers than usual knowing the ones that get stuck-in will still contribute to the squadron game
Oh yeah definitely worth it. If you're taking Plo, though, add some Jedi to clear the skies/give you grit. Probably good advice with Yularen or anyone else too, for that matter!
DeleteAh cool, cool. Good to know I'm not completely crazy. Lol.
DeleteI'm experimenting with a multi-role fleet with an emphasis on fighters and every time I try a build I come back to the concept, the nevoota just seems to be a standout choice for making mediocre y wings into actually useful support for the torrents