
Hey guys, John here to let you know we brought back GP to write a longer article about some fundamental tactics of the game and thinking and.... you know what, i'll just let him take it from here, ha! See you soon from us all...
Hey all, GiledPallaeon again, back with another article about Star Wars: Armada. This isn’t a battle report, at least not specifically. Rather, I’d like to sit down and try to capture some lightning in a bottle and put together some thoughts about how to approach maneuver and deception in Armada.
Quite some time ago now (about a month prior to this essay’s original publication (in 2019, oof sorry on the timing there)), I was on Twitter and ended up having this conversation here. It wasn’t planned, more of a spur of the moment discussion. This article is intended to try to be a formal writeup and distillation of those thoughts and ideas into something other players can use to think about how they approach the game and hopefully improve their understanding of the game. Without further ado, the Fundamentals of Tactics.
For the purposes of this discussion, we’re going to make some assumptions. Assumption 1: you are intending to win your game of Armada. Assumption 2: we’re going to ignore objectives, for the most part. They are an absolutely critical part of your game plan, but for now they’re either irrelevant, or going to muddy the waters, so we’re ignoring them. However, what this means vis a vis Assumption 1 is that you are intending to win via force of arms. You are intending to destroy your opponent’s ships and squadrons (hereafter Red, to your Blue), and you are intending to minimize your casualties, preferably to zero, but at least to less value than you extract from Red. Simply put, you should be blowing up more of their stuff than yours.
Any armchair tactician knows the best way to break your opponent is to apply more strength than his defenses can withstand, rinsing and repeating as necessary. This is often idealized into something along the lines of “Apply your strength at your opponent’s weakest point.” This is a good goal, but it’s a rather lofty one. It involves identifying the most vulnerable element of your opponent’s plan/fleet, which may not be the point that would die/break the fastest, identifying what Red’s potential counterattack options are, and defeating those before Red is able to enable them. That’s a tall order and one we aren’t getting into. More practically, I suggest you look for opportunities more generally to apply strength that overmatches Red’s defenses (a quick and easy example is an H9 equipped MC30 versus a flotilla, but we’ll get more in depth). Ideally we want to economize effort so that we can do this quickly and efficiently, but overmatch at all is a necessary prerequisite.
If we cannot achieve overmatch, even locally, that means any engagement is doomed to give up more points than it will score. To be clear, I’m not saying overmatch has to be instantaneous (though it does help). What is necessary is that when the dust settles, you have to have won the exchange, and done so meaningfully. If you cannot, you must rely on scoring more points from the objective than you will give up in losses, which logically at best will usually lead to narrow wins, and leaves you vulnerable to catastrophic defeats. One CR90 will in all likelihood never defeat an ISD. Four of them concentrated on the other hand have options to achieve victory.
In order to do this, we need to know our own strengths, and we need to identify potential overmatches for our opponent. The easiest way to do this in Armada is to consider threat ranges. A “threat range” is basically “Given that Ship X is at Relative Position 1 of Ship Y, what damage should Ships X and Y expect in an exchange?” For example, a CR90 at medium range of the front arc of an ISD 2 is in a lot of danger, whereas the ISD, while likely to take damage if the CR90 lives long enough to shoot, is almost certainly fine. Conversely, if the CR90 is in the rear arc of the ISD, neither poses much threat to the other. I suggest reviewing expected damage for various arcs and dice combinations, but also review the various ship cards and ranges yourself. Book learning is no substitute for experience.
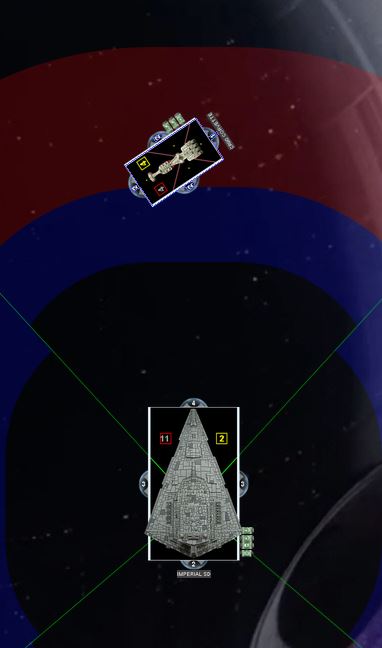 |
| A traditional matchup! |
That’s all quite obvious to an experienced player, but we haven’t gotten to the meat of our problem yet. Conventionally, when you examine a ship’s firing arcs, battery dice, and upgrades, you are considering its threat range in a 2D space centered on the ship. Here’s the catch: a game of Armada is not 2D, it’s 3D, the third dimension being the all important dimension of time. Let’s go back to that CR90/ISD example. When the CR90 is in the front arc of the ISD, and the ISD is going to activate first (for whatever reason), the CR90 is in a lethal threat zone. There is a strong chance the ISD can kill it if the dice behave, and even if they don’t, the CR90 is likely to be badly damaged.
However, if the CR90 is activated first and had properly planned their maneuver to evade the ISD’s front arc once it is complete, the CR90 is no longer in a lethal threat zone. From the ISD’s point of view, the CR90 never occupied the lethal zone, only two different positions outside of it.
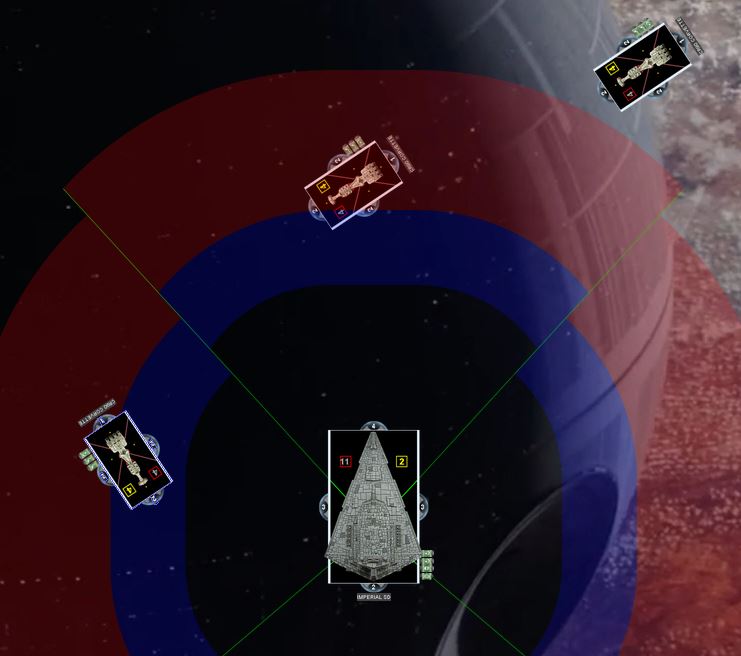 |
| Dodge, duck, dip, dive, and TRC |
For this reason, the most important attributes of a ship’s threat range are impossible to compute off the table: what is the board state influencing the ship? What is its current speed? What options does it have to change speed, or to change heading? Given everything else going on in the game, where will the threat zones be the next time that ship is activating? Where should my ships be, relative to that future state, to put Red’s ship in my lethal zones? How can I stack my lethal zones to maximize fire on target while minimizing risk in return?
This is a fully dynamic problem. There are many moving parts, not all of which you can directly influence. Obviously, there are trivial solutions to the problem. If you have absolute superiority (almost certainly due to skill imbalance, before or during the game), you can apply that superiority, in military terms that overmatch, directly across a wide front of your opponent’s fleet and destroy them at your leisure. Activation advantage and being first player can mimic this overall overmatch in the hands of a moderate player. The challenge is then incumbent on the second player to inflict more losses of ships on the first player than they are receiving in return to eventually break the chain, while the first player is attempting to hold the advantage.
That’s not an interesting case though. (Trivial solution is the mathematical term.) What about matches between players of equal skill, who must apply the differential strengths of their fleets to achieve victory? In my opinion, we now have a much more interesting challenge. Each player is conducting those 3D threat zone calculations I mentioned above. Each player will be attempting to predict the other player’s options, and how they can mitigate the mitigations if necessary. How does either player gain an advantage in this situation? One answer: their opponent’s threat calculations must be in error, and that error must be a designed intent of the maneuver plan and board state. Now, ladies, gentlemen, and assorted others, we move out of Maneuver into its close relative: Deception.
For the rest of this discussion, we will be focusing on tactics, techniques, and procedures to achieve information overmatch (i.e. deception) against your opponent. In other words, we are going to try to use information, either gathering information about their plans, or concealing information about ours, or even presenting misleading information about our plans, to lead Red into making mistakes we can exploit. This is the fundamental goal of deception. Then we will briefly discuss what to do once we have achieved this. In so doing, ideally, we will create situations where Red has either misapplied their force, or maneuvered themselves into positions where we as Blue have little to no danger to ourselves but can decisively win the game.
To be inescapably clear, I am not advocating in any way, shape, or form, you lie, cheat, illegally manipulate the board state, or otherwise deploy underhanded tactics against your opponent. DO NOT DO THIS. Under the current FFG Floor Rules, you will be removed, and you will deserve it. I will do it personally at tournaments I am judging. What I am advocating in “deception” is, to quote Grand Admiral Thrawn, “Make them the architects of their own destruction.” If you’re looking for irony in my user name quoting Thrawn, I’m right there with you. You’re concealing your hand while forcing them to put their cards on the table.
The following rules are not the only way to deceive your opponent, nor are they intended to be authoritative. These rules are intended as Pirate Rules, i.e. guidelines, to help you understand how to shape your opponent’s play to your own ends.
 |
| Gif added by John |
As an example, one of the most common giveaways I see is using the maneuver tool obviously beyond where you can go this round. Slower ships (HMC80s, Interdictors, Peltas, etc) do this a lot, but it applies to a lot of ships when they are moving slowly. Don’t drop your full two activation maneuver plan on your speed 4 template even though you are speed 2. If necessary, estimate by flipping back and forth between the maneuver tool for this movement and the range ruler and estimated future positions. You’re still giving me information, but I’m getting a lot less and I have to make less accurate estimates of my own. Similarly, don’t measure a range that is not obviously under immediate discussion. I’ll notice, and I’ll think about why. Assume your opponent is smarter than you; that way, you’re either right, or pleasantly surprised.
 |
| Get em, pickle! |
Some other examples: If you are outdeployed (or expect to be), take objectives that narrow the battlespace to an area you can concentrate your forces. When approaching the enemy, maintain a dispersed formation that can mutually support but does not offer obvious forking targets. You don’t want a close-range ship killer (for example an MC30) to be able to easily run up and threaten two targets, of which you can only save one if you can’t kill the MC30. Some of this is achieved with physical distance laterally, but too much distance risks letting your forces be isolated one by one and defeated in detail. This is why it’s important to maintain that mutual support. For example, put long range ships further toward the rear or edges of your formation so they are farther from danger, but still covering vulnerable lines of approach to close range ships or things like your flagship. Similarly, powerful close range ships like Kuats can position themselves on the vectors between enemies and friendlies to force a ship trying to attack the weaker targets to maneuver around or through it first.
Keep that flexible formation that can hit any number of points across Red’s fleet until the last possible second. Especially against bombers, not revealing where they need to go can be game-winning. Flipping this on its head, consider what maneuvers you can do to force your opponent to reveal their plan. Paul Tomashevskiy used this very skillfully in our last game at NOVA. By cutting the Super's speed to 0 then back up to 2 with a sharp turn he changed where the engagement would occur several times, and tried to get me to show my hand. Unfortunately for him, my nerve held (if only barely).
As a final note on this rule, it is possible to deceive someone who has perfect information. It is however extraordinarily difficult. Unless you have a very keen grasp of that person’s psychology, and present the full information in a way that they misinterpret it, the opportunity for deception is entirely reliant on a mental mistake by Red. NEVER assume Red will make a mistake. You’ll live a lot longer that way.
Rule 1: Give Red as many chances to screw up as you can engineer. Fundamentally, the goal of your deceptive tactics is to force an error that you can exploit. The best chance of accomplishing this goal is to give your opponent as many chances as possible to make that error.
To be inescapably clear, I am not advocating in any way, shape, or form, you verbally harass, physically annoy, or otherwise deploy underhanded tactics to distract your oppone. DO NOT DO THIS. Under the current FFG Floor Rules, you will be removed, and you will deserve it. I will do it personally at tournaments I am judging.
What you can do, however, is look for opportunities to subvert expectations, which may cause an unnecessary reevaluation of the game state on the part of your opponent. When you have multiple valid strike options, exercise them in different 2D parts of the board in succession, to keep Red’s attention shifting from one ship to another, and back again. If the Squall fighters have begun their attack run on the X-wings, attack Yavaris’s side arc from another direction with your Arquitens from a flanking position. You simultaneously can attack the weak shields of the Rebel frigate, and add another vector for them to be worrying about.
 |
| You KNOW this was written a while ago, someone besides John is using a Neb B! |
Rule 2: One of the most effective ways to distract someone from their original plan is to present a credible threat to that plan, forcing them at a minimum to recalculate, and possibly make a less optimal move. I cannot stress the word “credible” enough. If I am lining up Demolisher to attack Gallant Haven, a CR90 sitting off to the side in TRC range of where I am likely to end my attack is not a credible threat. Three unactivated B-wings sitting in that position are a credible threat.
 |
| John's edits are as subtle as.... well, Demolisher |
There are several game mechanics centered around giving a player the opportunity to apply this rule with only minimal opportunity by their opponent to pre-empt it, only react to it. These are the Hyperspace Assault objective (what are you going to do about Landmonition double-arcing Home One’s nose), the Profundity title, and Admiral Raddus. Deploying these threats in positions where the target either cannot escape or can only escape into somewhere else you want them to be can be extremely effective, as noted by the fact it’s an entire Commander power.
Rule 2A: Threats are not the same thing as lures. Use threats extensively, lures rarely. A carefully placed threat does not need to expose itself to danger. By definition, a lure is attempting to invite attack (that you think you can live through or escape after being attacked) and therefore does need exposure to danger. (You are trying to draw out an attack after all.) Overlapping Ackbar TRCR90s are a threat where their firing solutions overlap. Paragon pushing forward out of formation out where the strong arc does not cover the likely Red approach is an attempt at a lure, especially for a ship not very threatened by an Assault Frigate’s weak arcs. The Assault Frigate is a poor lure because it can’t do damage if everything is in its front arc, and you can’t take sustained heavy damage. The point of this exercise is for Red’s threat calculations to fail and pull them out of position, either unable to threaten you, or where you can threaten them. A failed lure is one your opponent exploits without cost, like losing a ship. A successful lure can still involve you losing a ship but in so doing, they have mispositioned themselves in such a way that you can exploit worth more than the loss of that ship.
 |
| Things look fine for the HMC80! |
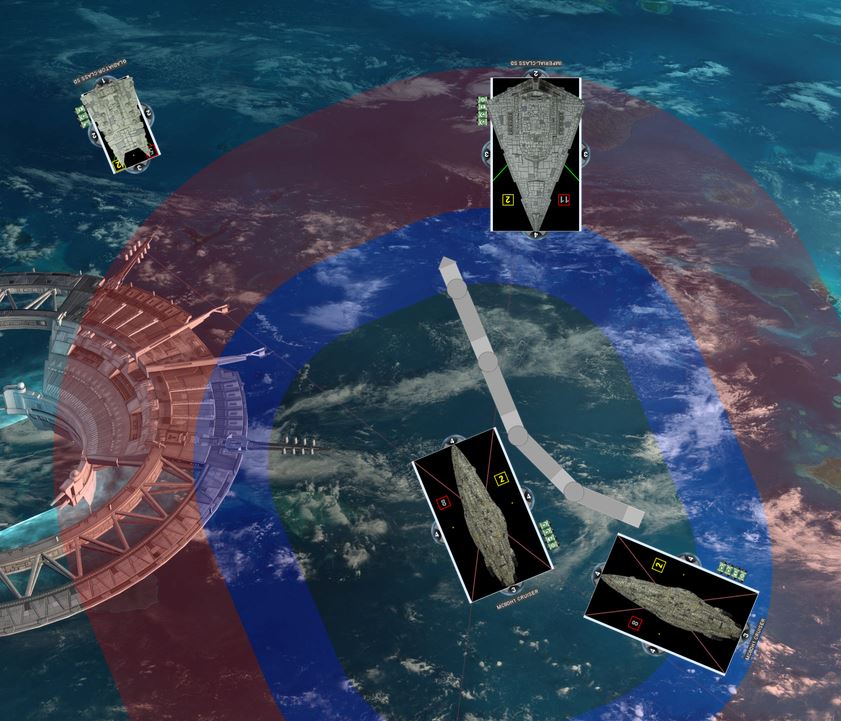 |
| Told you, it looks FINE |
| And now for the flipside.... that ISD I'm sure is ecstatic |
As part of your threat calculations, it will frequently be necessary to expose your ship to danger. The addition of the Salvo token on the Starhawk and the Onager makes this ever more critical to continuously assess danger. Your intent must include rules about what is that acceptable level of danger, and what levels of risk are acceptable for what level of danger. Sovereign can weather more danger than a Quasar, but it is still vulnerable. Of the utmost importance however, is setting some aggregated level of danger after which, where possible, the ship (or squadron) will attempt to disengage.
I call this limit the disengagement threshold. If a ship’s situation meets some set of requirements (ISDs/other Larges without braces, no remaining shields, primary target destroyed, etc), its overriding priority becomes disengaging from the battle and keeping itself alive. For lighter/cheaper units (hello generic squadrons), that disengagement threshold may not exist. For high value units (HVUs) like Large base combatants, flagships, and other key components, knowing when to bug out is of critical importance. A key way to extend this, if you can afford to, is strategically timed Repair commands rolling back damage, but this is often a risky or even outright ineffective strategy if not coupled with actively leaving the area of danger.
Rule 3A: Corollary for competitive players: as a matter of human cognitive patterns, I recommend experimenting with disengagement thresholds. I recommend conducting these experiments while you are simultaneously experimenting with the exact complements of your fleet. During practice runs after the fleet is settled, tuning those thresholds is wise, but major changes are not. In a tournament, especially a longer one, you will become mentally fatigued and revert to well-practiced habits. Make sure those are the habits you want them to be.
Rule 3B: As a personal observation, I have not found risk versus reward to be a linear relationship, nor is there an S-curve. In my experience, it is a bell curve, where there are acceptable amounts of risk and reward, as well as rewards with no risk, and risks worth no reward/capable of giving none. As an example of the latter, a Raider (of any kind, with any upgrade suite) is not capable of destroying a HMC80 under the vast majority of circumstances by itself. If such a situation arises, where it is either mathematically impossible to achieve a reward, or highly improbable, any level of risk for that is automatically unacceptable, as you cannot gain anything from it, while Red can. In other words, stop throwing your ships away when having them leave is the smarter answer for you and your MoV.
Rule 3C: This loops back to Rule 3A, but it’s important enough to warrant its own bullet: once you have set some disengagement (i.e. retreat) thresholds. DO NOT VIOLATE DISENGAGEMENT THRESHOLDS. Say it with me, class. DO. NOT. VIOLATE. DISENGAGEMENT. THRESHOLDS. You set that line where your ships and squadrons pull out, stick with it. Under only the most extreme circumstances (flipping the game result entirely) should you even consider violating disengagement thresholds. You should have experimented and tested them. You came up with those metrics for a reason. You are not necessarily at your best at the table, especially later in a tournament. Current Blue should trust Old Blue. You are giving Red a free opportunity for you to make a mistake. Do not assume Red will miscalculate the same way you did.
For example, if one of your disengagement thresholds is that Star Destroyers without brace tokens (Intel Officer, Nym, however) don’t attack new targets, don’t send that Star Destroyer off chasing a TRC CR90 without a very good reason. You decided that you take too much damage in those situations, so you should break off. The alternative chase might allow the CR90 to do enough damage to finish off your wounded ship and escape, leaving you down another Star Destroyer with nothing to show for it.
Rule 4: Overload Red’s priority planning. I don’t know how most people think, but when I am playing, I am maintaining multiple lists of priorities and plans in my head simultaneously. One list is the priority targeting for Red’s ships (what’s the most valuable/most killable thing of mine Red can shoot at). The other lists are what I believe Red’s priority list for my ships looks like (all else held equal, Red shoots my flagship over a support flotilla, etc), and what Red’s actual firing solutions look like (is the flagship in range). Behind all of that is what my current plan is (“Activate my ISD/send my squadrons to attack or defend in this area/then send a repair token to the flagship with the Gozanti”), and what I think Red’s plan is Balancing these lists and plans is key to finding opportunities to enforce your will on your opponent.
Rule 4A: Several of us are grown adults with children, so this will be easy to think about: pretend your opponent is a small child. Frequently you will have to make moves that present your opponent with a choice. Ideally they will take the worst choice for you, but you can try to push the situation so they take the worst choice for them. In any event, make absolutely sure all of Red’s choices are acceptable to you if they are chosen. If there is an outlier that is most detrimental to you, assume Red will take it. Worst case, now you know what Red is doing. Best case, Red has made a mistake, and you can go from there. If Chimaera has caught a CR90 and a Comms Net flotilla, make sure General Dodonna isn’t riding that CR90.
 |
| Man, I hope you got Lando equipped.... |
Rule 4B: Where possible, not only overload his target priority but overload his activation priority. This goes back to presenting threats. Red’s ISD may want to wait for my Pelta to come into range for a quick and easy kill. However, if Admonition is sitting in the ISD’s side arc, Red may not have the luxury of waiting for the Pelta, even though it is the optimal move for applying damage to me.
 |
| I've done this and it's beautiful. That's right, I've used a Pelta. |
This tactic will grow more effective if multiple Red HVUs are simultaneously threatened. In chess this is called a fork. However, where I recommend a distinction that is difficult to replicate in chess, prioritize threatening multiple Red HVUs with multiple assets of your own. Point your ISD at the vulnerable side of Mon Karren, while Demolisher is lined up on two CR90s. Individually, MK is the HVU, but if Demolisher can rapidly flip activation advantage in Imperial favor, the CR90s are also now collectively an HVU. Removing either threat has the added bonus of not affecting the other threat. No matter what Red chooses, you’re happy (Rule 4A).
 |
| Space chess gonna space chess |
Rule 5: Keep moving and set the operational tempo. Obviously this is easiest to do with last/first, or even just activation advantage, but combine the above techniques into dictating the flow of battle. Red should always be assumed to do what Red thinks is best, but if that is an irrelevant action, you maintain the tactical and strategic initiative. You as Blue in that situation are in the driver’s seat, choosing what ships, both Blue and Red, are exposed to what lethal threat zones, when they are exposed, and what ships can move out of what danger when. This is the ideal state of deception where deception no longer matters. Your strategic control may now reveal whatever information it so desires, because the information is now immaterial. Red cannot do anything with the revealed information because of whatever the situation is. This state is rarely (read: never) truly stable, and must be maintained until your opponent is fully defeated, but it is the ultimate goal. In other words, once you have control of the situation, don’t take your foot off the gas. Floor it.
Rule 5A: I’m going to paraphrase Grand Admiral Thrawn here: Make Red the agent of their own destruction. It is extraordinarily difficult for a player to completely exert their will onto their opponent. Pure overmatch is extremely rare. What instead should be the goal is to identify elements of Red’s plan that you as Blue can subvert and use to advance your plans. You now no longer have to spend the energy forcing the relative positions into what you need because Red is unwittingly helping you. For example, luring Imperial swarm aces forward to hit your squadrons will also pull the carrier in that direction, even with Boosted Comms. That carrier may now be more vulnerable or out of position for something else. Review information control (Rule 0) to better understand this.
Rule 5B: In the firearms world, there is a saying: “Don’t point your weapon at anything you do not intend to shoot”. The same applies to attacks from your fleet. Do not engage scenarios you cannot obviously win. In all situations, maintain an escape vector if it becomes clear that your original threat calculations (yours on Red, or Red on you) were incorrect. Where possible, put the attacking ship in the “immunity zone” of your opponent. Their “immunity zone” is any position wherein even if an unfavorable activation order is forced, the attacking ship is exposed to acceptable danger. Preferably this danger is guaranteed to be non-fatal (thus “immunity zone”). For example, most anything can usually survive the side of an ISD, or the front of a HMC80.
As a corollary to this, shooting your way clear by destroying the ships directly on your path is an acceptable escape vector/plan. However, because Armada is a game of dice, remember that this is a risk. Be conservative in your estimates of damage that you can generate, and assume optimal defense token use when you estimate whether you can shoot your way out to be sure that you will be able to shoot your way clear, should the situation on the board change in such a way to force that option. As an example, a double-arcing Expanded Launchers Kuat with a reroll source and Boarding Vader can last/first any Large off the table. However, it needs very good damage rolls to do it, and preferably it would rather be doing it to a softened up target. If that softening hasn’t happened, make sure the Kuat will still be there once it has happened, and that the threats along her escape vector don’t pose the remaining level of threat required to be lethal.
Rule 5C: Alternate targets are a must. When presenting a credible threat, a good way to make Red make a mistake is to give Red a choice. When the Super Star Destroyer activates, it can shoot either Admonition or it can shoot Defiance. Which ship will Red choose to try to save? If Admo is in a lethal zone, that’s an urgent issue. However, if Defiance can escape into areas where the Super won’t be able to generate enough damage for the rest of the game to kill it if it moves now, what choice do you make? There are many, what a researcher might call state variables that answer this question on the table that this example doesn’t have. (How much is Defiance’s risk lowered, what is the state of Defiance and Admo, what’s the objective situation, etc.) However, by presenting both threats with a lethal (eventually lethal in Defiance’s case) threat, the Super Star Destroyer has taken control of the tempo of activations, and retained the ability to hurt Red regardless of their choice.
 |
| We've got em just where we want em! |
For a more concentrated discussion on what tempo can and might look like for different fleets, please see this post by Ginkapo, now hosted on his blog.
Rule 6: Never assume Red will willingly make an error. I’ve been hammering this point several times throughout this discussion, but this really, really needs to be clear. In a high stakes game (e.g. Worlds, Prime cut for a Worlds invite, etc.), it is extremely likely your opponent is either better than you, or at least as good. No one intentionally makes mistakes. When you are trying to engineer a mistake on your opponent’s part, bear this in mind, so that you can appropriately plan for when they don’t fall for an obvious gambit.
For advanced users, please see the following Advanced Rules (again not at all exhaustive, just what I have for you right now.)
Rule 7: Your opponent is doing all of this to you too. Both of you came into the game with a game plan. The game is now a contest to see who can better execute their plan on the table. Your choices are either to fully execute your plan first (e.g. table Red), or remove their victory condition (deny the objective, send a ship out to prevent tabling, etc.). Follow through on whichever is your plan/victory condition. As an example of somewhere objectives matter, acceptable losses may be higher to a list consistently earning 12-15 Fire Lanes tokens than a list playing non-scoring objectives.
Rule 7A: Where possible, figure out what Red’s plan is. At a high level, you should be doing this as soon as you review each other’s fleet lists at the beginning of the game. Review the threats. Short-ranged brawler ships? Red range artillery? Sloane fighter superiority? Rieekan Acehole bombers? Knowing the outlines of your opponent’s probable plan is key to divining their exact plan, and will make that happen much faster. It is essential that you remain aware of this plan so that you do not accidentally feed it. If you are playing Precision Strike, don’t give him ram damage to freely flip on your starship. If he is trying to use Rift Ambush to pull your ships out of formation, or Surprise Attack so they start out of formation, account for that in your own deployment and maneuvers, and prevent it as best you can.
If your opponent does actually match you in skill, do not expect to get away with a free lunch. Combat is fundamentally democractic; Red gets a vote too. Sometimes it will be necessary to accept losses to win the battle/war. Give up the light ship to draw off the enemy bombers. Lose the brace token to Intel Officer, knowing you can kill the ship carrying it or evade further damage. Everything is disposable for a win.
Rule 8: Stick to the plan, and don’t try to break his plans if that wasn’t your plan to begin with. Obviously for a major tournament your list and/or (preferably and) tactics should have solutions to the problems posed by all major archetypes you expect to be present at the event. Sometimes those plans will directly attack those of your opponent. For example, squadless lists will frequently bring Slicer Tools to interfere with the squadron commands of carriers. Other types of lists will answer with brute force, naked aggression, and high speed to get quick tablings.
However, occasionally on the table, you will be presented opportunities to more directly attack your opponent’s plan. Going back to Rule 6, don’t assume what you believe to be a mistake is in fact a mistake. If attempting to exploit the supposed error is a deviation from your plan, I can only recommend that you not follow through. As I have previously stated as my opinion, you will probably not be at your best when you are at the table, particularly during later rounds where this applies to Red too. By changing course mid-stream so to speak, you are inviting unforeseen variables to interfere with your calculations. Unknown variables are just that, unknown, and present the exact sort of dangerous risk I have recommended here again and again you take all reasonable steps as Blue to mitigate. Go for it if you’re sure, just don’t blame me later. If you didn’t expect the Raider to suddenly make its attack run, changing the target of your Defiance shot may be exactly what your opponent intends, even if you kill it. Now the Star Destroyer you originally planned to shoot may stand a much better chance of surviving its own duel with the Mon Cal cruiser.
***
I can't claim I am always doing any of the above totally consciously. My playstyle, as elaborated in my NOVA writeup, tends to be rather seat of the pants, an in-the-moment rhythm I either have or I don't. I'm doing all of this and none of it at once. This is my attempt to discretize my process into usable ideas that I have specifically identified for myself in the past. Hopefully this is educational, informative, thought provoking, or otherwise a productive read for you. This isn’t an easy subject to put on paper beyond vague generalities, and I won’t necessarily claim I did much better here. But I do hope you the reader got something from this today, and I hope that one day you too can contribute your own nugget of information to the state of Armada thought.
Many thanks to @Snipafist, @geek19, @Formynder4, @shmitty, and several others for helping me hone these ideas, particularly in the format you see before you. Additional thanks to the bloggers at Steel Command for agreeing to host this writeup there as well.
Jokes on GP, they're our bloggers now! Slash since we merged and all.... But if you have questions, feel free to ask about these all! And thanks GP for writing this all up for us!
Love all the concepts here, as well as the in-depth discussion - I'd like to highlight one other concept which you allude to but don't specifically call out. Concentration of Force (or to call back to all the War Studies analogies in this article, the Schwerpunkt). A lot of my Armada planning comes down to "how do I outshoot my opponent at the critical location/time" and "how I get more firepower to bare at the key moment than my opponent". There are lots of ways to concentrate ones force: flying in formation so that your main arcs overlap, arc dodging to keep your main arcs on target while avoiding your opponents, or using your squads to alpha strike all your opponents interceptors before they can shoot you. To summarize, it's not about how many points you have in the game overall, but how many points you have in the critical location at the critical time (as an aside, the flexibility provided by squads allows easy and flexible concentration of force at critical points - which is one of the main reasons why I enjoy heavy squad lists).
ReplyDeleteAs a small suggestion - it might be useful to summarize Rules 1-7 with a simple phrase that encapsulates them. IE Rule One: Subvert Expectations