
Cross-faction ships! The ol' Victory! Bringing its might to the Republic! Just like we always something something let's break the ship down and pretend it has value.
 |
| I believe retail is about $49.95, but maybe you have an old one sitting around? |
 |
| The red paintjob technically COULD go faster |
As always, throwing up the card! A ship breakdown! Before I go any further, anything I heavily borrowed stole from Eric's Victory article will be in RED, as per usual. Expect some crutching but also some minor changes as well, much like when I "heavily borrowed" it for the Acclamator articles. Considering the GAR Vic is very much costed between an Acclamator and a Venator and I definitely have a way of finishing this sentence to describe the ship positively.....
To cut to the chase early: a lot of people hate Victories, and I'd be lying if I said I don't understand why. The ship has some serious design issues that can cause it to struggle:
- Maximum speed 2. This isn't inherently awful (many ships with a higher maximum speed will still spend much of the game around speed 2, such as ISDs), but it can be troublesome when you need to chase something down or run away and you just can't step on the gas to make that happen. Speed 2 and an Engine Techs "third" aren't the same as speed 3, especially if/when you need to hop something in your way. You're GAR, you don't "hop" so much as "plow through."
- Terrible yaw. They get a single click of yaw at both their speed settings and it comes at the final segment of the maneuver tool. No non-huge ship has worse yaw than a VSD does. Because the click is further along than an Acclamator, as well, it's much harder to correct bad deployment and bad navigation.
- Trying to get your front arc on target with poor yaw can be particularly frustrating against fast, maneuverable ships like CR90s.
- A single blue flak die for flak is poor for the VSD's points cost and coupled with its low speed means that it can't threaten bombers going after it nor can it outrun them. You'll need fighter squadrons to keep bombers from picking you to pieces.
- No defensive retrofit slot. So long as a VSD gets to use its defense tokens, it's actually pretty durable. If it doesn't, it can be surprisingly vulnerable, especially given it's not fast enough to run away.
- 8 hull and 10 total shields fairly even distributed across the arcs taking most attacks (the front and sides) make it a pretty durable chunk of ship for its points cost, but an Acclamator does similar for cheaper AND could have a defensive retrofit and speed 3. As mentioned earlier, though, defense token debuffs (particularly anything that hoses/locks down your brace) can cause problems.
- Dice. Just lots and lots of dice for its cost. 6 in the front arc, 3 out the sides, and 2 (red!) from the rear. Compared to the Acclamator again, it has a better native salvo and dice that are somewhere between an Acclamator-I and an Acclamator-II. For more points cost than either.
- Speaking of the front arc, it's a big juicy wide arc that covers a large amount of real estate.
- 3 Squadron and 4 Engineering are pretty standard for "heavy medium" ships and could allow it to act as a decent second-tier carrier and to repair as well as most large ships.
Deployment weights heavily on how useful a VSD is going to be before it even activates. Good deployment is important for every ship, but the worse a ship's speed and maneuverability, the more important deployment is because you have less capability to "fix" a deployment mistake. Given the VSD has a terrible nav chart, your deployment decisions with it are extremely important. Try to deploy the VSD as late as possible so you have the most information about where to put it and try to keep it towards the outside of the fight (so it's tough to gang up on or go around "the long way") but not too far to the outside (where it's easy to run away from).
Okay, well that sounds pretty bad, right? Well... I mean yes, it can be. But let's talk about what the VSD has going for it before dismissing it out of hand:
Basic usage recommendations and why you take this

This is a Star Destroyer. SPHA-Ts go on "Star Destroyers Only." EVERYTHING else you do with the Vic is based around this fact. Any other job you have it do should focus on that fact and the fact that trying to outfit it for a specific other MAIN role can be done by another ship better.
Focused on Projection Experts helper bot? Pelta for cheaper and better maneuverabiliy. Carrier? Go read my Acclamator article. Expanded Hangar Bay and FCT? Why not TWO Peltas instead? Tanky cheap ship to stay alive as a flagship that isn't a Venator? Thermal Shields on an Acclamator-II is 1 point more expensive, and I guarantee that will help you more than the Vic's 1 more hull. However, a SPHA-Ts Vic starts at 82, 15 points cheaper than a SPHA-Ts Venator-I. NOW we're talking! I will present in the builds section below a few alternatives in the "I know better than John!" section. You're welcome to scroll to it, but assume every Vic until that starts with SPHA-Ts equipped. That is going to factor into the rest of this article. I'd like to say it's better at a SPHA-Ts role but it's basically a Venator with 1 less hull and speed. A lot of similarities to that ship below, although you have slightly different arc lines of course.
VSDs love friends. VSDs do not do well unsupported because getting around them is generally easy to do and with their poor yaw they don't get a second chance to attack anything that slips past with their front arc. By operating near other ships, their flanks are guarded and slipping past them becomes much more dangerous. Flank guards don't need to be expensive - ships like Peltas and Consulars do just fine and can still do what they want to do while also making going around the VSD's side dangerous. VSDs can also team up with larger ships like Venators to guard one another's flanks. Because you'll be firing SPHA-Ts out of the arc you placed it in, make sure to lead your target (see discussion below) with your SPHA-Ts placement. You can use SPHA-Ts as a replacement side-arc, and if everything lines up that's 6 side and 6 face dice! In practice it's very often 5-6 and 3, but that's solidly better than 2 and 3. Try to capitalize on the chances to go 6/6 though.
Let's take a look at a normal front arc versus a SPHA-Ts one.
 |
| Vic and hardcell(s) deployed on the line, both going speed 2. |
 |
| And just in range! Depending on where you end up, any of the 5 ignition tokens could work. |
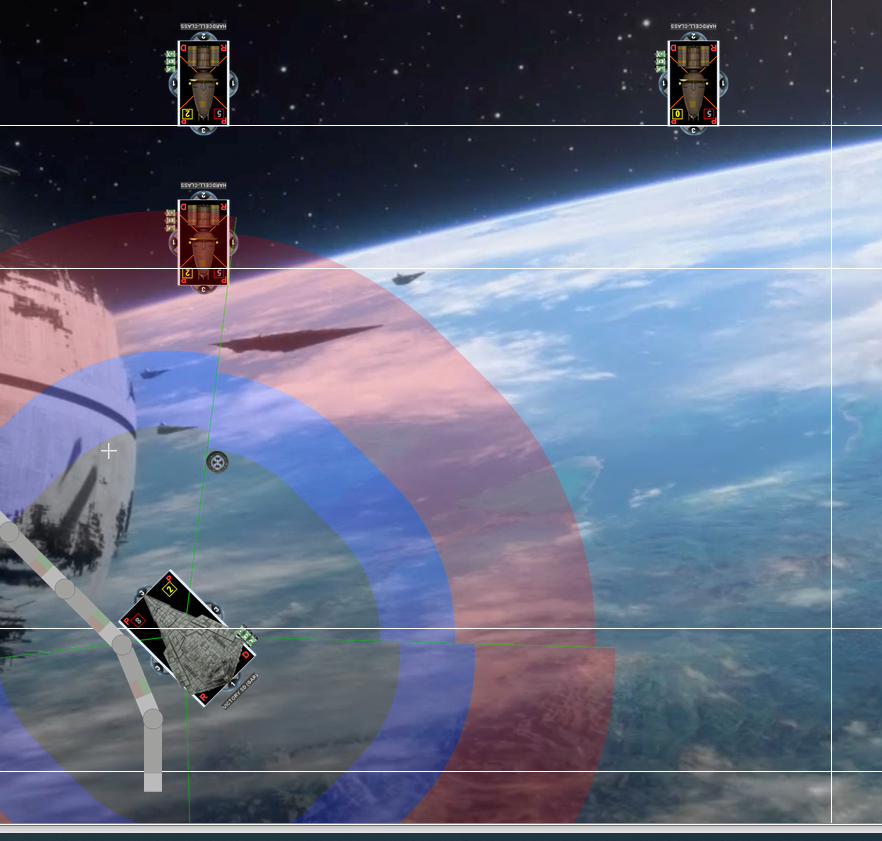 |
| Hooray, a double arc, just like you want |
 |
| Anywhere in that bubble is 5 blue coming at that hardcell. |
Navigate constantly unless you have something better to do. Remember those speed chart problems I mentioned earlier? Maneuverability in particular is a huge problem for VSDs and by using navigate commands to increase your yaw (and change speed when necessary) you are doubling your yaw. The significance of doubling your yaw cannot be overstated and it helps the VSD keep its front arc on targets and to some extent avoid trouble. I encourage you to think of it this way: if you use a navigate command to keep a target in your front arc when you otherwise would not have been able to do so, you just used a better concentrate fire command - at full dice range, you get twice the dice from a front arc attack vs. a side arc attack and even at red dice range you get 1 more dice overall, the same as concentrate fire but much more likely to be in a situation where enemy attacks are directed at the front hull zone where you can redirect more effectively (to either of your 3 shield sides).
Consider speed 1. This isn't to say don't ever go speed 2, merely consider speed 1 at all times. VSDs have a tendency to overshoot targets heading towards them when they go speed 2 because they simply can't reposition well enough with their limited yaw. Once the enemy is past them, it's nearly impossible to get the front arc on target again. When going speed 1 (particularly with the extra yaw from a nav dial), you get more time with enemies in your front arc. The examples I gave above are for speed 2 on both; and you won't get the SPHA-Ts off turn 2 if you and they are speed 1. HOWEVER, Engine Techs at speed 1 both lets you stay at speed 1 and do a 1-1 just as if you did a navigate dial. That IS another 8 points added on, of course. I personally would probably rather just navigate on turn 1 and 2, using the dial on turn 2 to drop to speed 1 and get 2 clicks of yaw as I line up those SPHA-Ts shots.
Don't concentrate fire. I'm sure there are always those 1% instances where concentrate fire is the correct command choice, but in general I strongly recommend avoiding it. Adding a single die to an attack when you generally are relying on timing it correctly with a sluggish Command 3 ship is rather tricky. You are nearly always better served using navigate (as mentioned above) as your default command, with repair sprinkled in as necessary. Keeping your VSD relevant through navigate commands pays off much better throughout the game than a single extra dice can.
"Constantly navigating" and "not concentrate firing" entails then having someone else pass the Vic the CF tokens to untap the SPHA-Ts at the end of the turn. Tarkin is easy mode, Munitions Resupply or Comms Net work as well, one of your other ships doing a CF command with a Clone Nav Officer, Vet Captain driving your bus, a nearby Hondo..... many possibilities, use them well. Even if you switch to Engineering at some point, you still shouldn't be concentrating fire to power up the SPHA-Ts. MAYBE on turn 6, if you're alive, you can concentrate fire. Keep your Vic alive for that long and I'll allow you to do it.
Don't command squadrons. With SPHA-Ts taking away 2 of your squads, you're down to Squad 1. Even if you somehow have Clone Nav Officer on this ship, your Squad 2 with token is now about 40 points more for the same effect as a Consular doing the same. TERRIBLE use of the command there. Squad pusher Vics are down in the aforementioned "Smarter than John" section.
Lead your targets. It's fairly common to see newer players direct their VSDs directly at the ships they wish to attack next turn. The problem with this approach is that unless the VSD activates before the intended target, the target can usually zip out of the VSD's front arc before the VSD gets to shoot. For that reason, I encourage you to turn the VSD so that the target is on the edge of your front arc with its future movement path taking it into the remainder of your big front arc. This makes front arc attacks much easier to line up and makes your VSD attacks less order-of-activation dependent. This is overall good advice for any front arc attack ship, but for something less maneuverable like a VSD, it's more important still.
This is even more important for SPHA-Ts shots for the Vic as well. You need to lead to make them bleed.
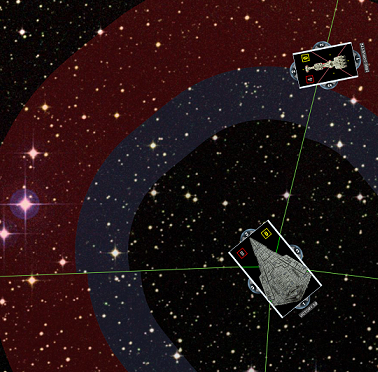 |
| For example, something like this! |
The VSD-I has the substantial benefit of being cheap for all its raw stats (hull, shields, dice) at 75 points. Please remember to try to keep it as cheap as you can.
I encourage you to think of the black dice as a deterrent (oh, so you want to get close, huh?) moreso than an active source of damage - the VSD's speed/maneuverability problems make it pretty unreliable at delivering black dice to targets more proactively like you can do with an Acclamator or Venator. Engine Techs could allow for some more aggressive positioning, but otherwise don't get your hopes up. The red dice can unfortunately be unreliable, and unless you're using some external dice-fixing (like Intensify Firepower) it can be difficult to count on them to deliver when you need them to.
So it's slow, you can't count on delivering its black dice, and its remaining red dice aren't reliable damage dealers. Why would you use this ship again? Well, let's hope the non-SPHA-Ts upgrades do some good work for you.
Upgrades
Many of the upgrade choices are conditional on what you're trying to build your VSD to do, so it's going to seem like there are a surprising diversity of choices, but depending on the role you want the VSD to fill many of the choices are already pretty prescribed.
There's nothing wrong with leaving slots empty! If none of those upgrades help your VSD do its job, then don't fill them in just to fill them in. The more you fill the slots, the more it's going to be worth when it explodes. And it's a Vic. It will explode. GAR especially is a faction built around the slots you DON'T fill when building, just like jazz, I suppose.
Officers
A lot of your standard "big ship" officers here, but a few surprising options as well:
- Skilled First Officer is the cheap way to fill up the officer slot and help correct for your Command 3. I go into more detail in the (linked) SFO article the various uses for this guy but if you're not otherwise using the slot, I'd recommend SFO. I've used SFO on Assault Frigates before as a "oh I need to use engineering 1 turn earlier." With the multiple other GAR ways of keeping your friends alive, a well-timed engineering actually COULD keep you alive (provided you have all the other friends helping).
- Clone Nav Officer isn't the worst choice, but realistically you're pressing the navigate button for a few turns before you hit the engineering one. CNO doesn't let you store 2 CF tokens for successive turns for SPHA-Ts, so I wouldn't put it on here without a good reason for doing so. Nearby though....
You run into some issues here in that VSD-Is don't do any one thing strongly enough to have strong contenders for weapon team inherently. Depending on the rest of your build, though, several different options present themselves:
- Ordnance Experts is usually a mistake given how you can't rely on using your black dice, but on an aggressive Engine Techs build they have a place.
- You could also do Veteran Gunners if you vastly fear your blue or red dice flubbing on you for the SPHA-Ts, but I feel OE is a better (and cheaper) option. I'd rather just have dice fixing elsewhere, persnally.
- Clone Gunners if you vastly need an accuracy, and have a friend who can pass you tokens. Technically, you as a Clone ship can also pass/spot CF tokens to whoever else is using Clone Gunners (and I feel that's a better use of the upgrade, having it on a different ship and using the Vic as a spotter if/when needed). You're eating so many CF tokens that I really hope you can feed these ships/upgrades.
SPHA-Ts SLOT OR SCROLL DOWN
Ordnance
If it's anything at all, it's usually External Racks. VSDs usually won't get more than one round at close range against enemy ships and they can't guarantee they'll get their front arc either with their poor yaw, and that's the arc that's got a decent chance of triggering a black critical upgrade. External Racks work out of any arc and against any kind of target.
Ordnance Pods are an inexpensive way to improve your flak coverage against squadrons if you have the points.
Engine Techs Vic is probably the only VSD that can argue for black critical upgrades and now that they're cheaper and exhaust to use, it can't hurt to try. Your call on Assault Proton Torpedoes or Assault Concussion Missiles. It'll depend on the rest of your fleet.

 |
| That hardcell has taken so many shots already..... |
Otherwise, I'd probably include Projection Experts. Yes, I did say above that a Vic's primary job was not to be a Projection Experts helper bot. Think of it as a secondary job; it shouldn't be the main thing your Vic is doing, but if you end up out of the fight and aren't contributing shots, you can be pushing shields to a friend. A pair of Vics with SPHA-Ts and Projection Experts can support each other pretty well, especially if one gets fire focused upon it. The Vic being shot can heal itself while the other one pushes shields onto it. If both your Vics are somehow being shot, well, I hope your other ships can push over whatever is attacking your friends.
 |
| I generally don't make fun of our readers, but your idea is bad and I'm also mocking myself here. |
So you have a great idea huh? Even with that Acclamator right over there? Alright well here's the section on it.
 |
| Yes, I own one of these now. I may even take it out of its box someday! But lookit that antenna! |
Oh, this poor ship. It could be so neat, but instead it's just the worst of three types of triangle.
ReplyDeleteOn the topic of support team slots, Aux Shields Teams isn't awful on a SPHAT boat especially if you have more repair commands lined up to shuffle shields around (Bail likes them a lot), and makes the Vic a bit less likely to explode immediately. The lack of a second redirect makes them much less useful than they are on Harrow, but they're at least a cheap deterrent against an opponent drilling through your side shields while you try to line up a SPHAT shot.
They don't make the ship *good*, but if you have a way to feed them they're at least an argument over an Acclamator that isn't SPHATs.